0 Item
Save 20%
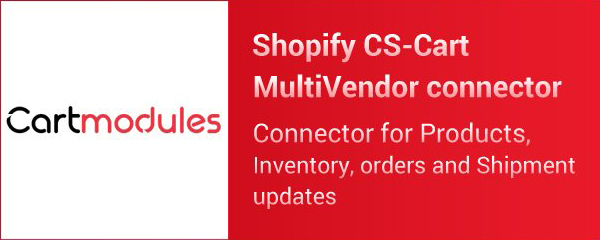


Shopify CS-Cart MultiVendor connector
Introducing our Shopify CS-Cart MultiVendor connector add-On, a powerful solution that integrate vendor Shopify shops with your CS-Cart Multivendor marketplace: enabling seamless data synchronization between the two platforms with features like Product Importing, Order Management, Inventory Management, Data Mapping & Shipment Generation etc.
Shopify Connector add-on for Cs-cart Multivendor
Seamlessly integrate your vendor’s Shopify website with your CS-Cart marketplace
- Seamless Integration : Connects Shopify with CS-Cart to ensure smooth data flow between the two systems.
- Product Importing : Automatically import products, including variants, options, descriptions, prices and images, from Shopify to CS-Cart.
- Order Management : Transfers orders from CS-Cart to Shopify for efficient processing and management, including order status updates.
- Inventory Management : Synchronizes stock levels to prevent overselling and ensure accurate inventory data across both systems.
- Data Mapping : Allows mapping of collections and product type from Shopify’s with CS-Cart categories to ensure compatibility between Shopify and CS-Cart data structures.
- Shipment Generation : One way Shipment sync from CS-Cart to Shopify
- The add-on simplifies admin tasks by automating product synchronization from Shopify to CS-Cart , ensuring efficient management and accurate data flow.
- The add-on provides customers with a seamless shopping experience by ensuring up-to-date product information and synchronized order processing across Shopify and CS-Cart.
Why our Shopify add-on is the ultimate choice for E-commerce Enhancement?
- Hassle-Free Integration: This add-on ensures a smooth and hassle-free integration process, allowing you to quickly and effortlessly connect your CS-Cart store with the Shopify add-on.
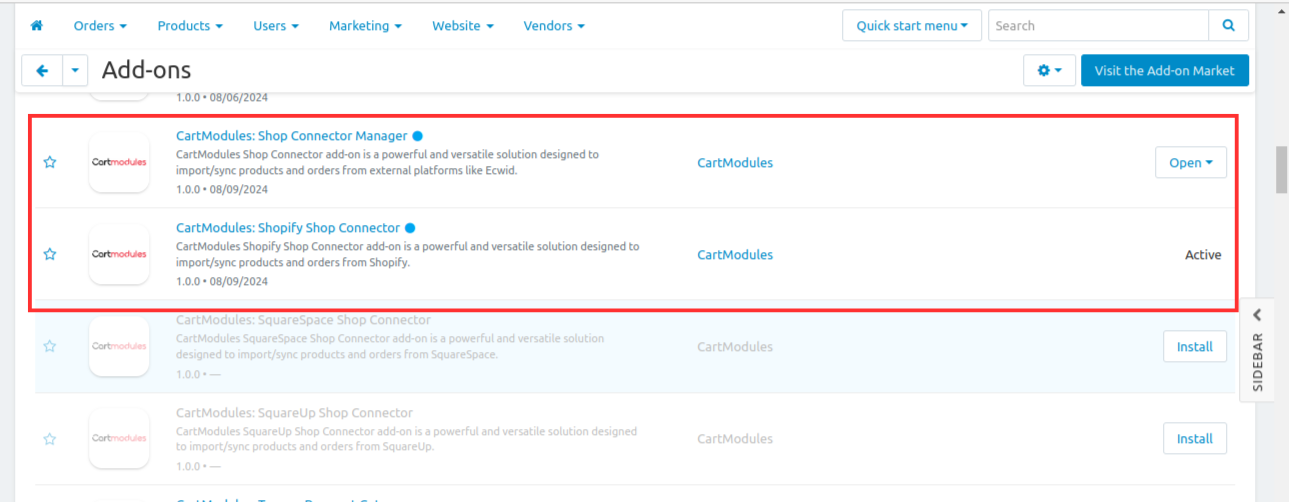
Note : The Shop Connector Manager should be purchased and installed before Shopify Shop Connector to make the Shopify Shop Connector functioning well.
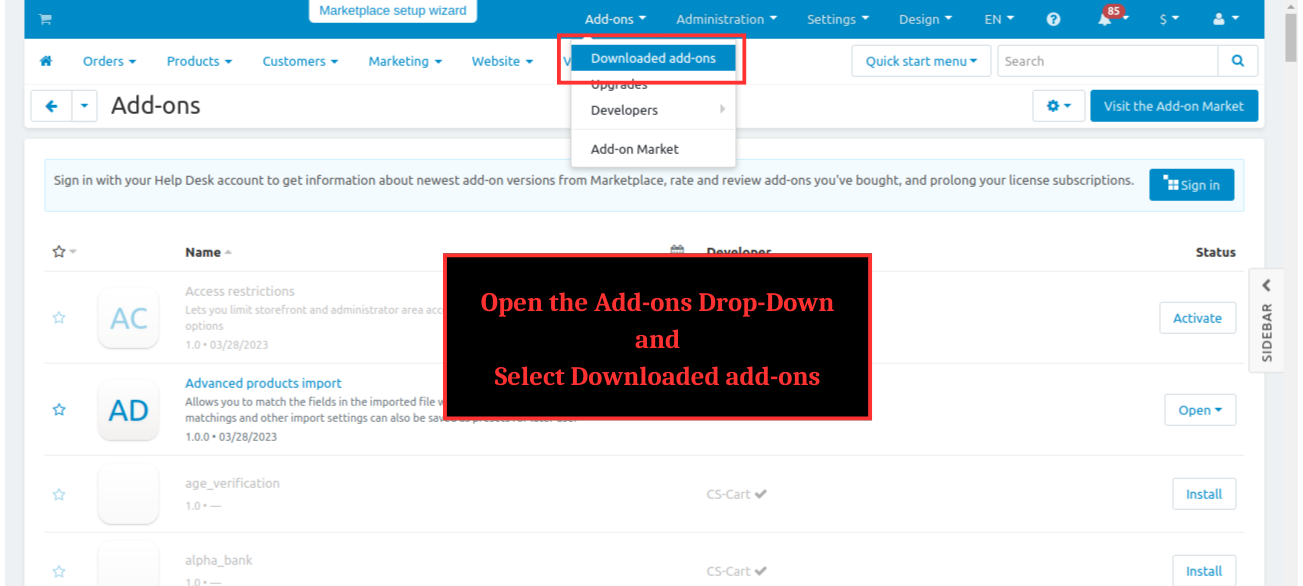
Add-on Installation Steps
Step 1 : Open the Add-ons drop-down and select ‘downloaded add-on’

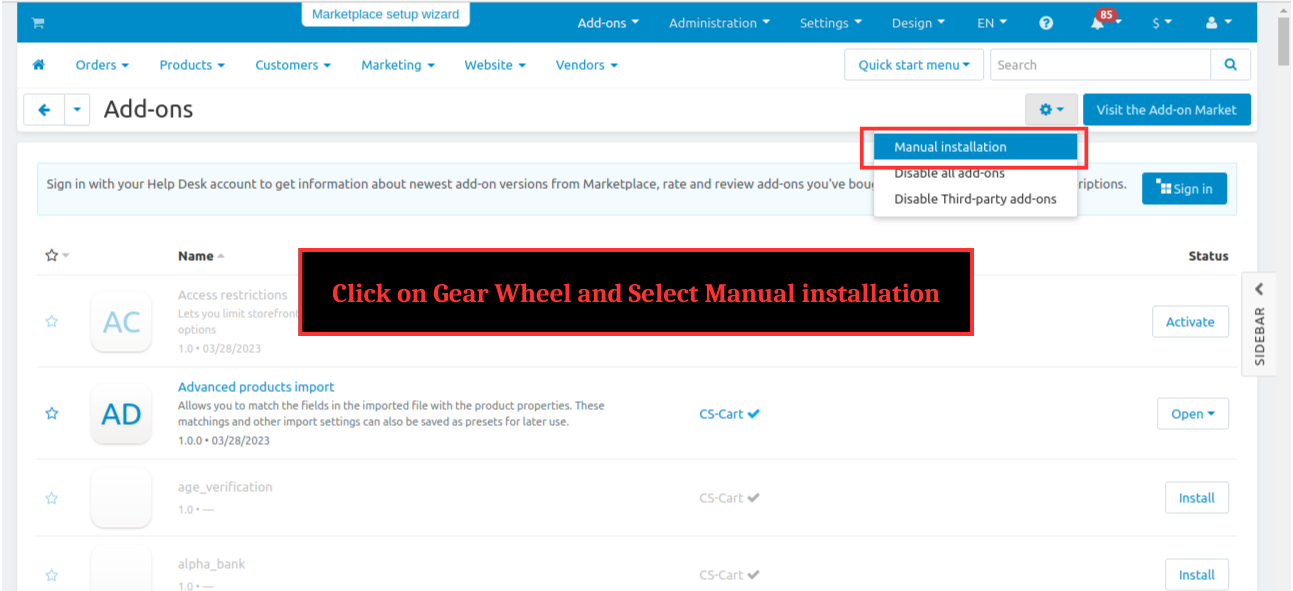
Step 2 : Click on gear wheel and select ‘Manual installation’

Step 3 : Upload the zip file and click ‘Upload and install’

The add-on installed successfully

Note : The Shop Connector Manager should be installed before Shopify Shop Connector to make the Shopify Shop Connector functioning well
CS-Cart Integration Steps:
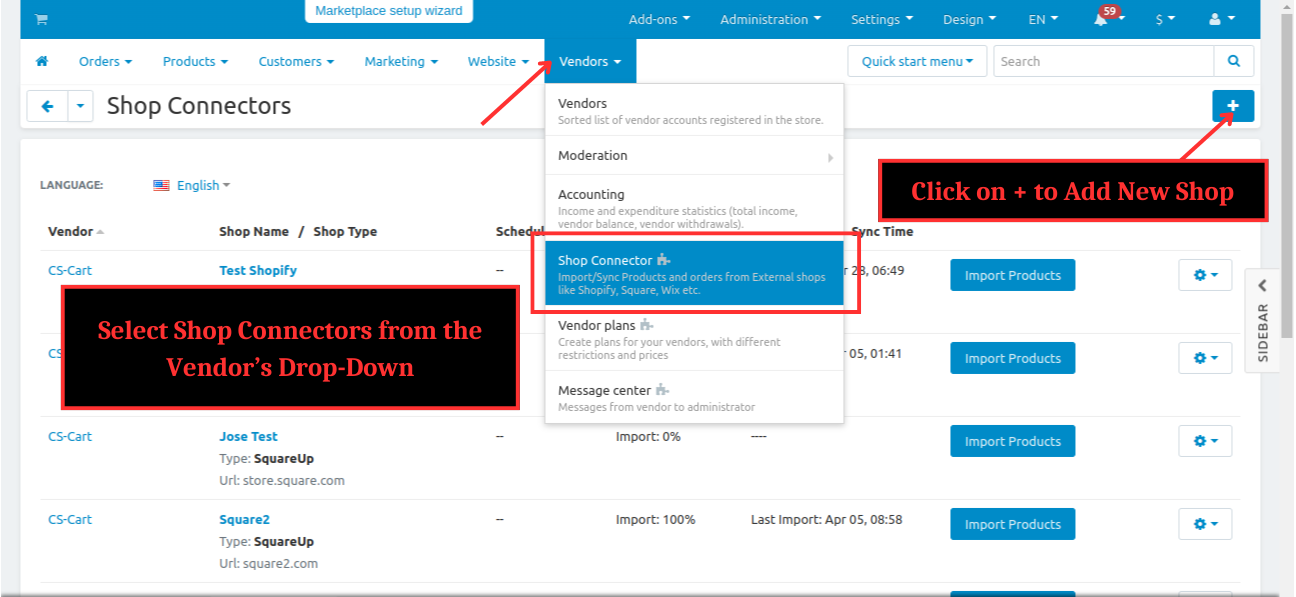
Step 1 : Open the CS-Cart and Select Shop Connectors from the Vendor’s Drop-Down and Click on + to Add a New Shop
%201.png?1724154275109)
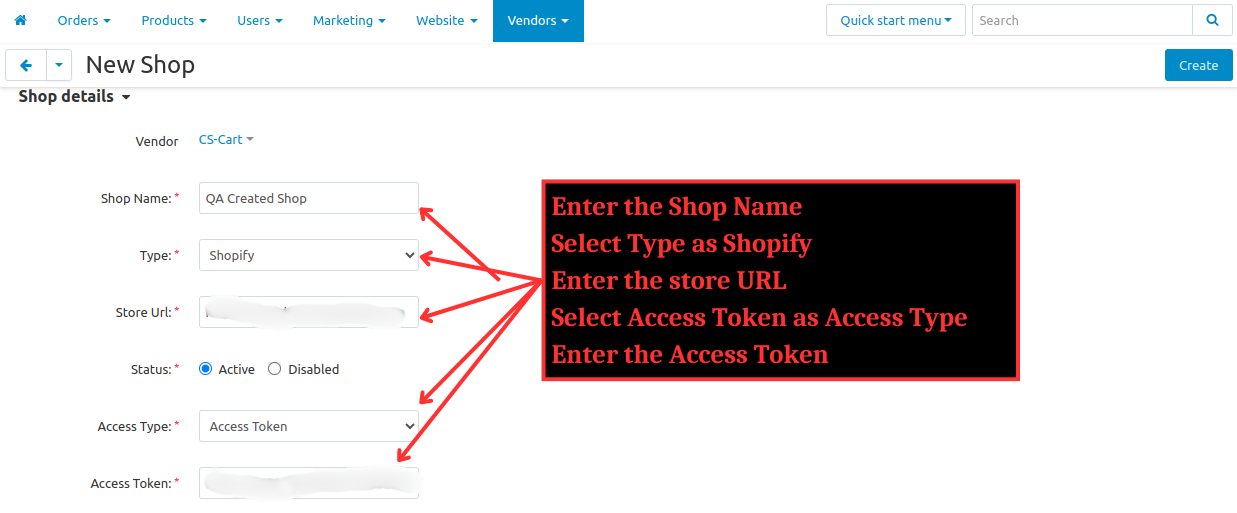
- Step 2 :Enter the Shop Name
- Select Type as Shopify
- Enter the Store URL
- Select Access Token as the access type, or use Client ID/Client Secret. Refer to the topics below (Shopify Integration Steps) to obtain these credentials
- Enter the credentials
- And click on Create
%202.png?1724154298221)
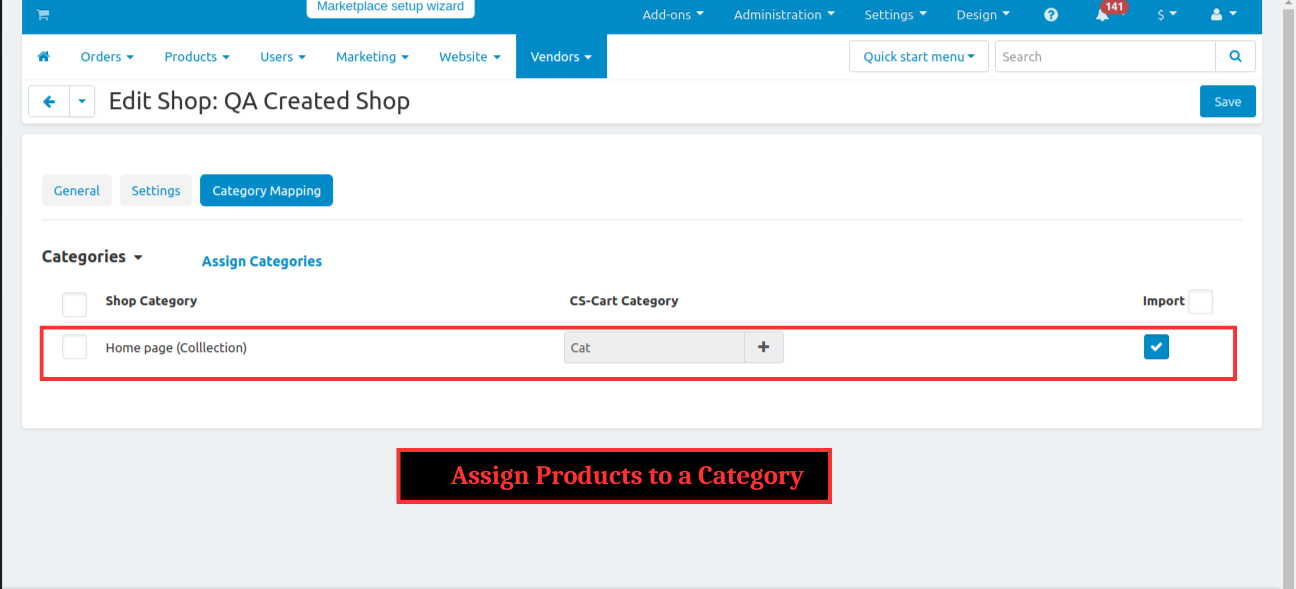
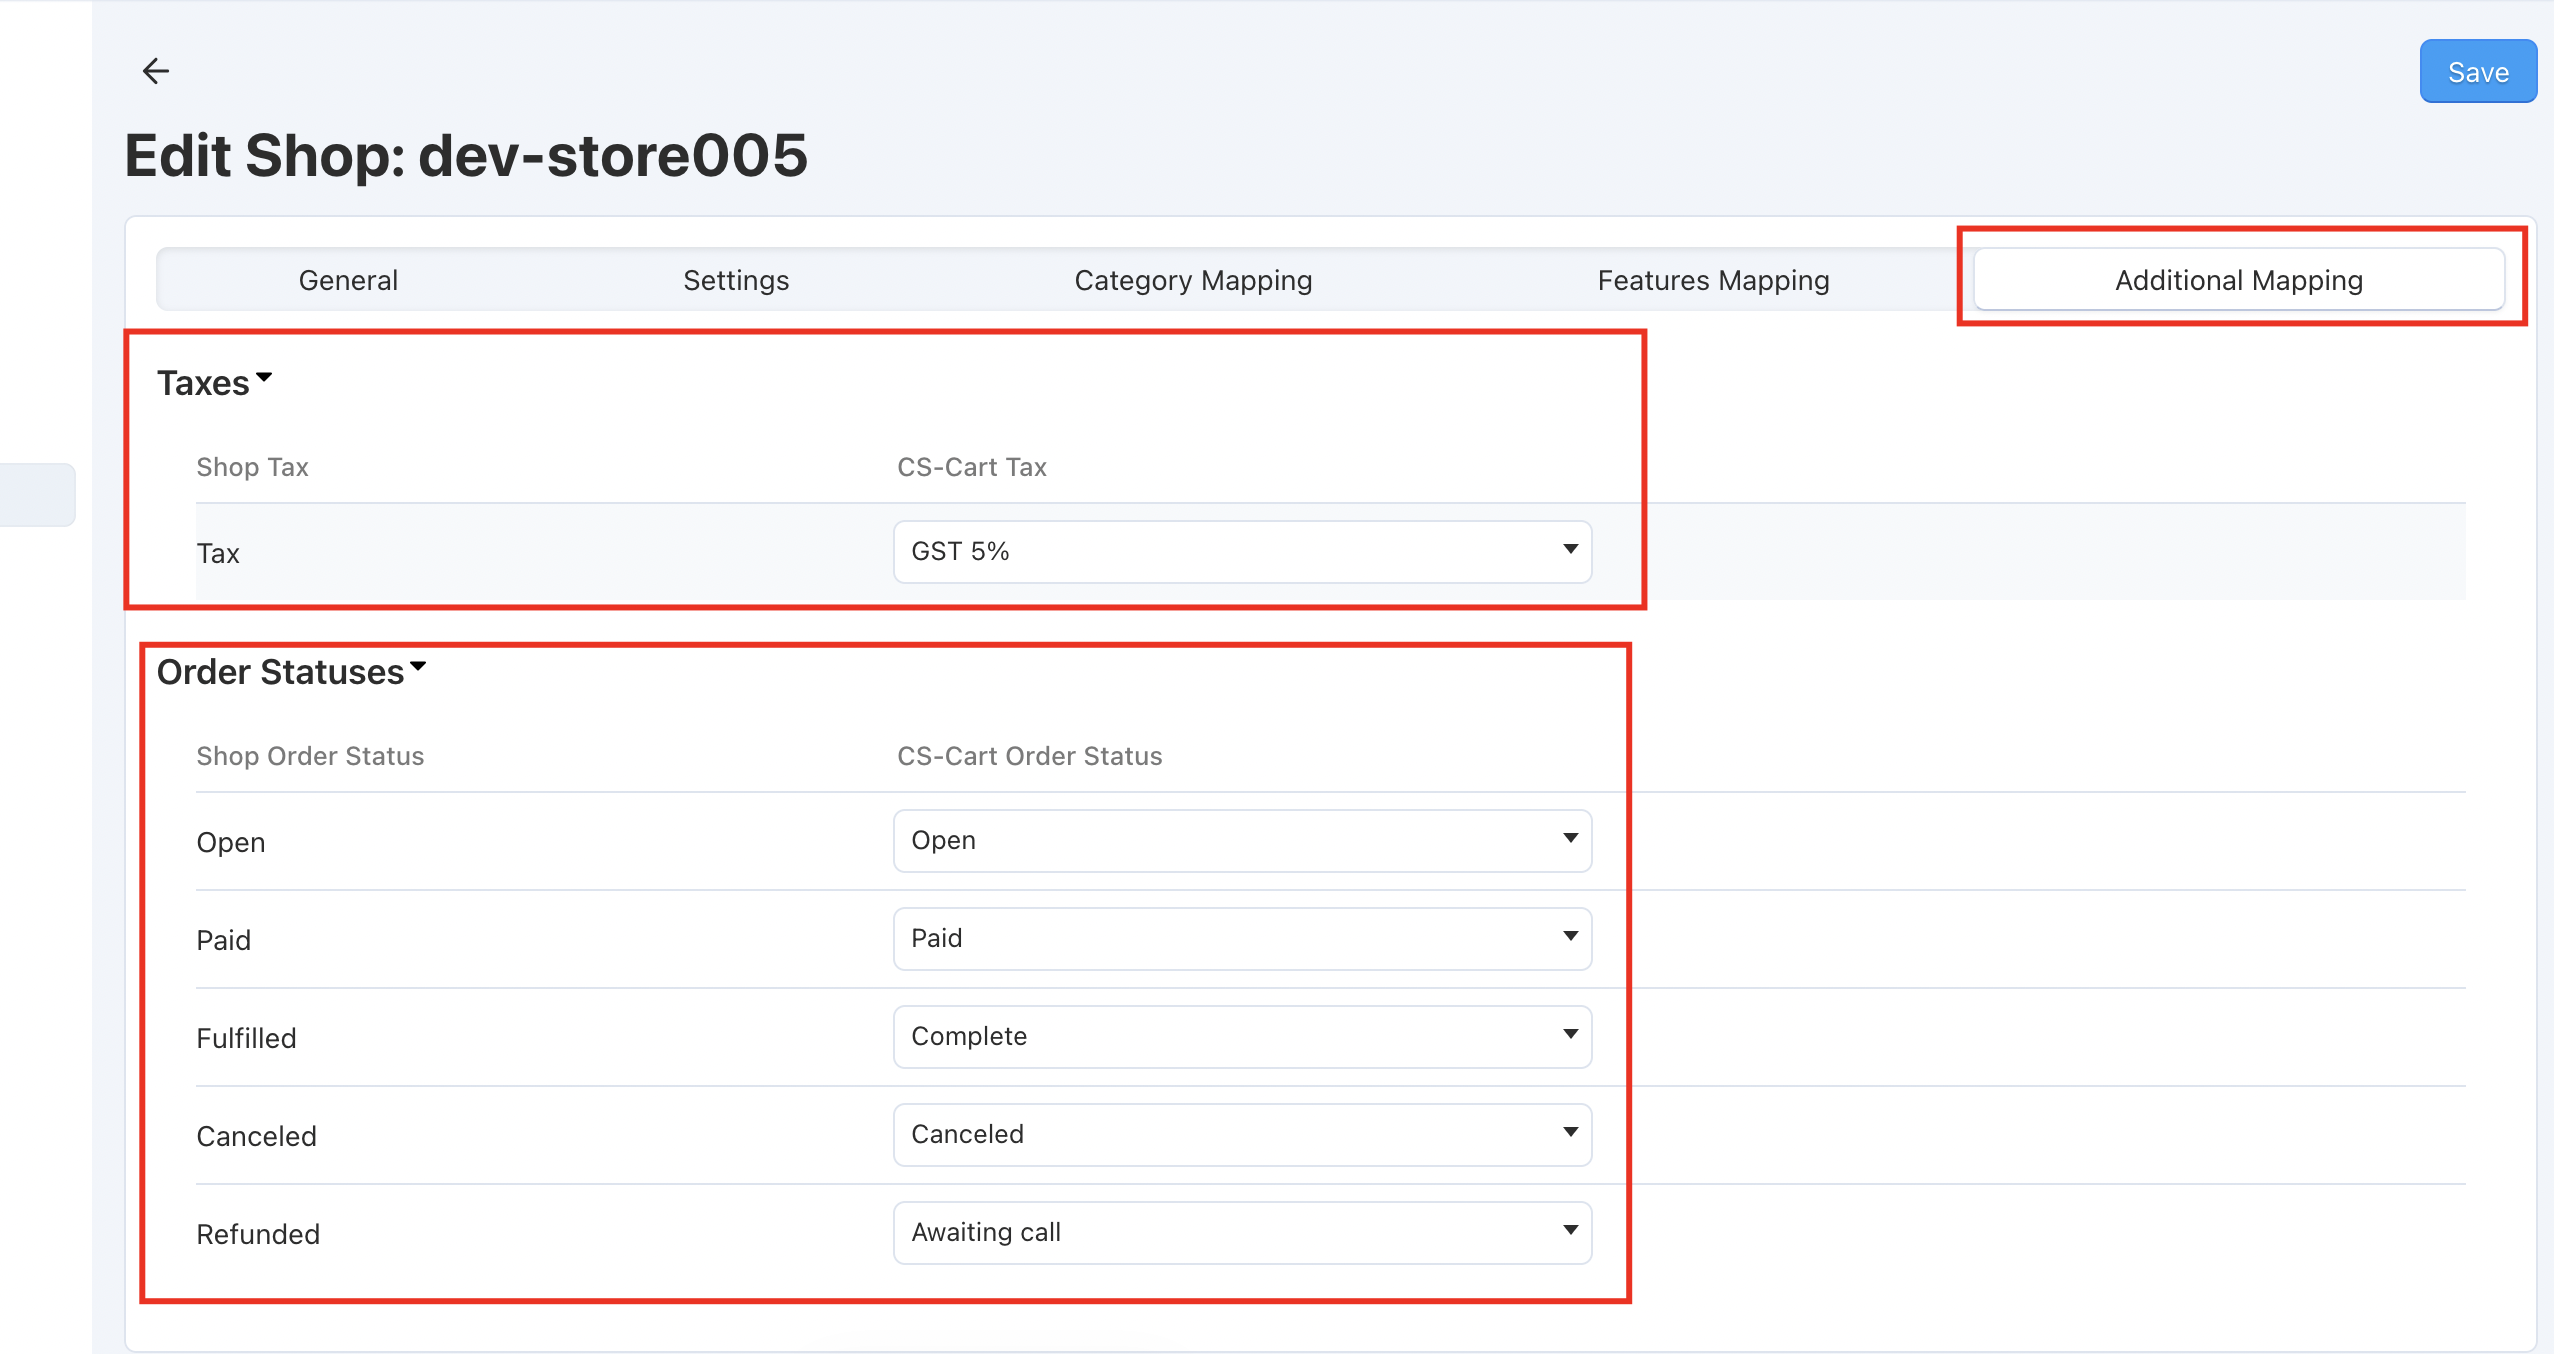
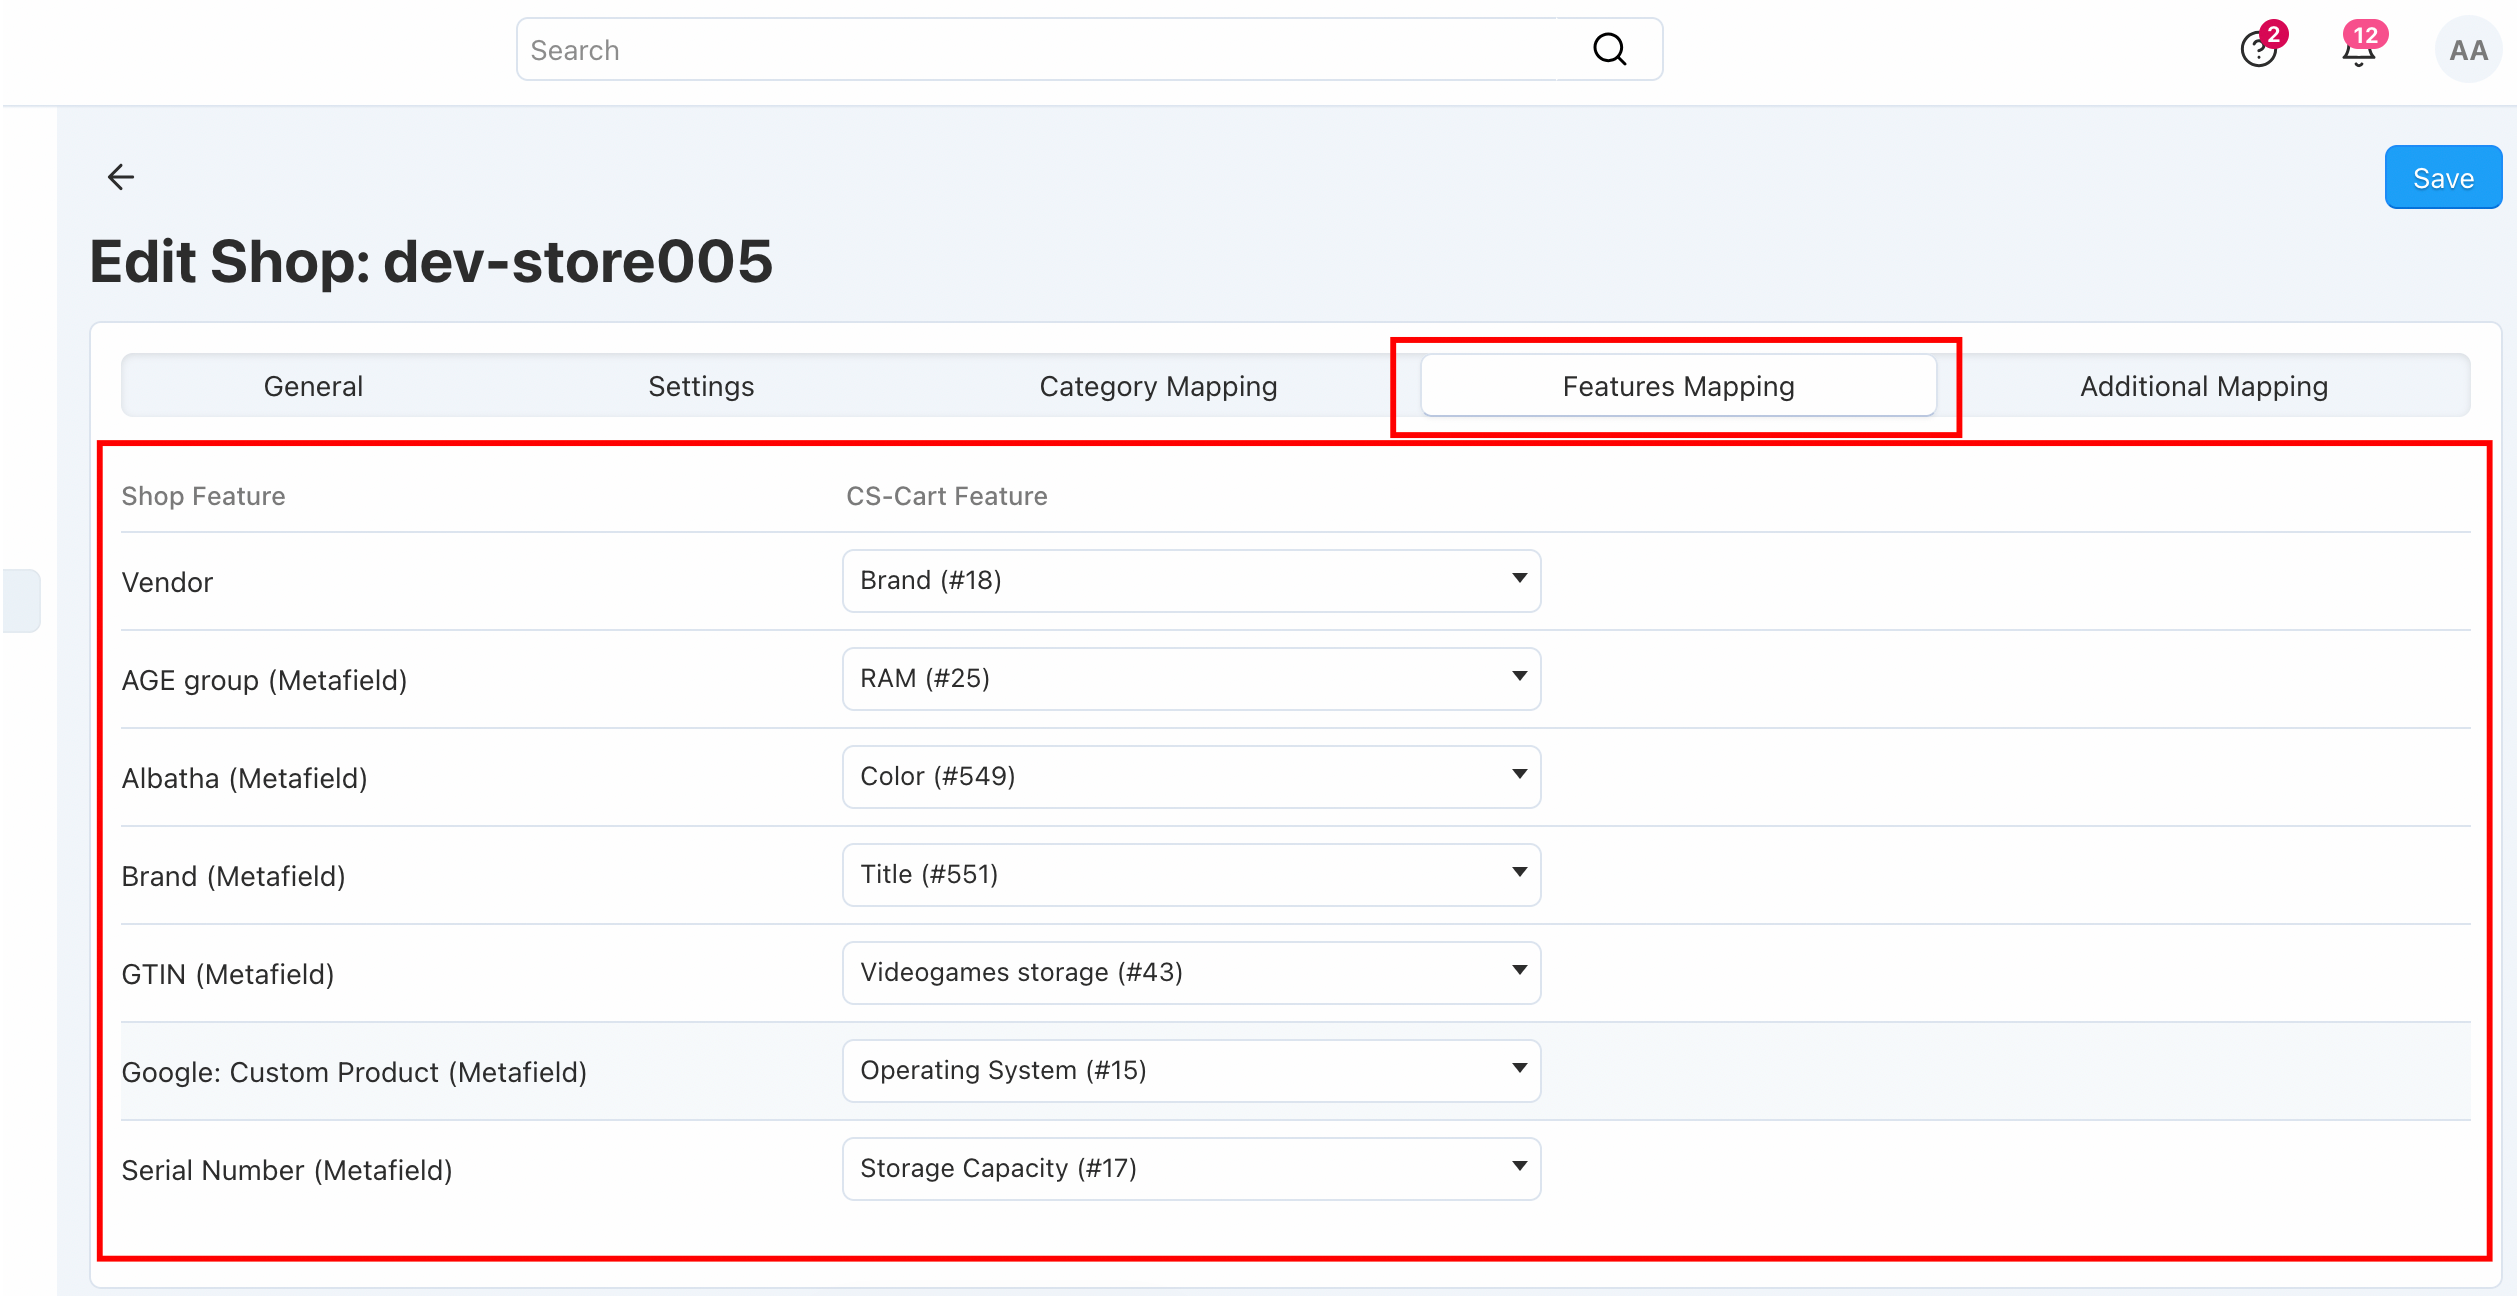
Step 3 : The tabs Settings and Category Mapping enabled , Assign Products to a category
%203.png?1724154310860)
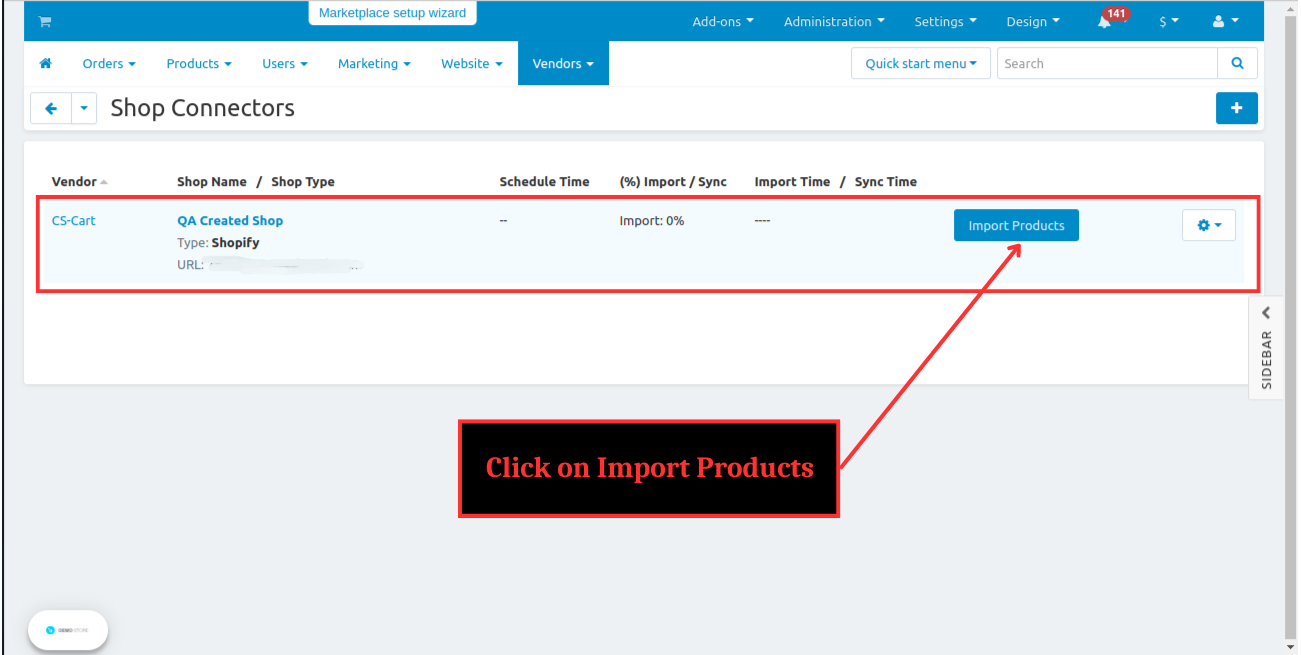
Step 4 : At the Shop Connectors Section , Click on Import Products
%204.png?1724154335995)
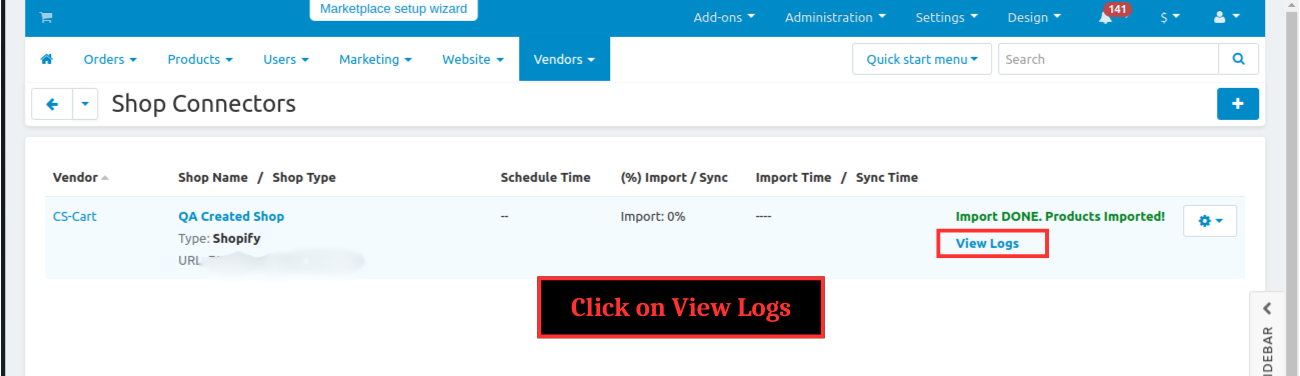
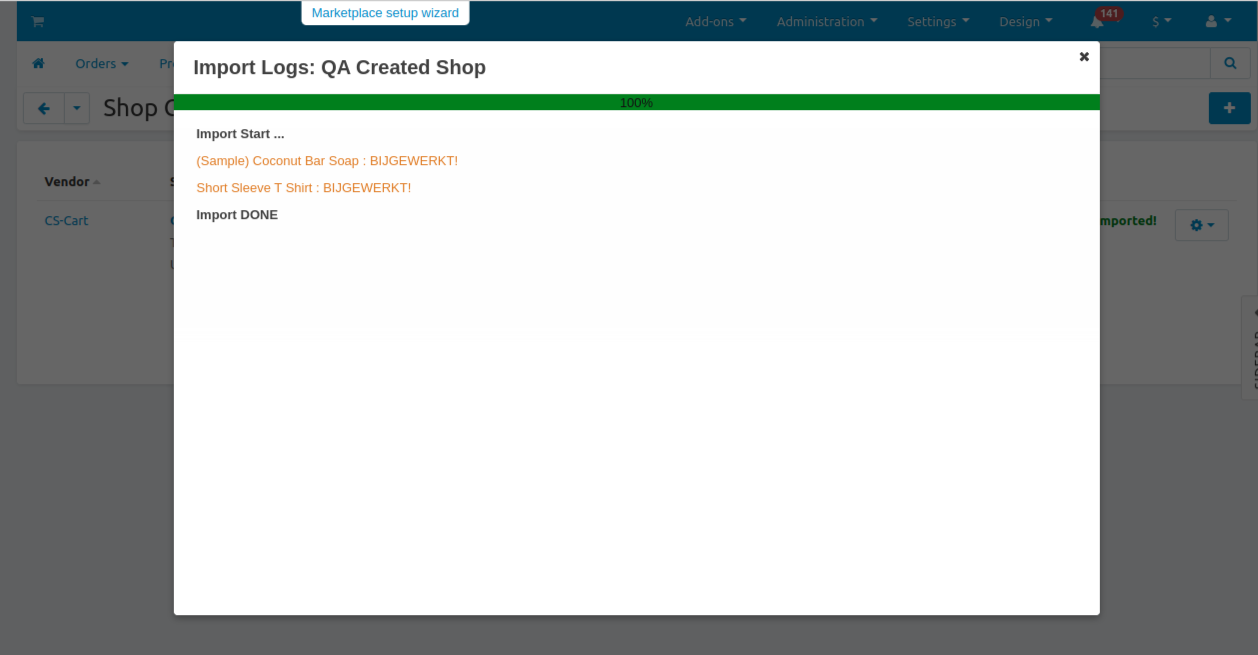
Step 5 : Click on View Logs
%205.png?1724154349203)
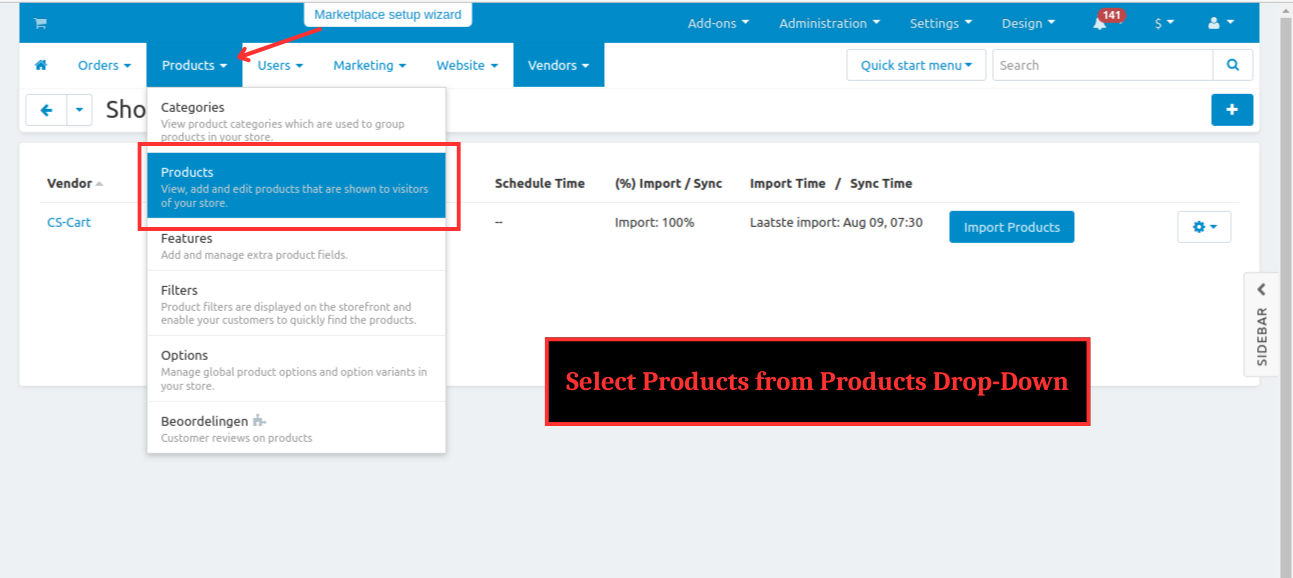
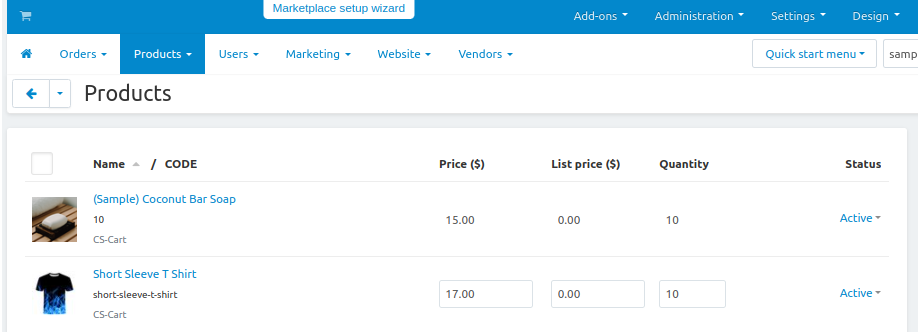
Step 6 : Select Products from Products Drop-Down
%206.png?1724154360229)
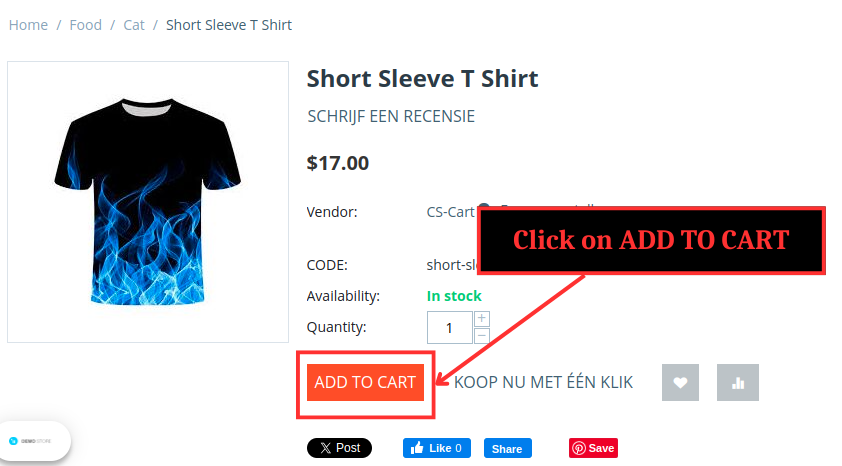
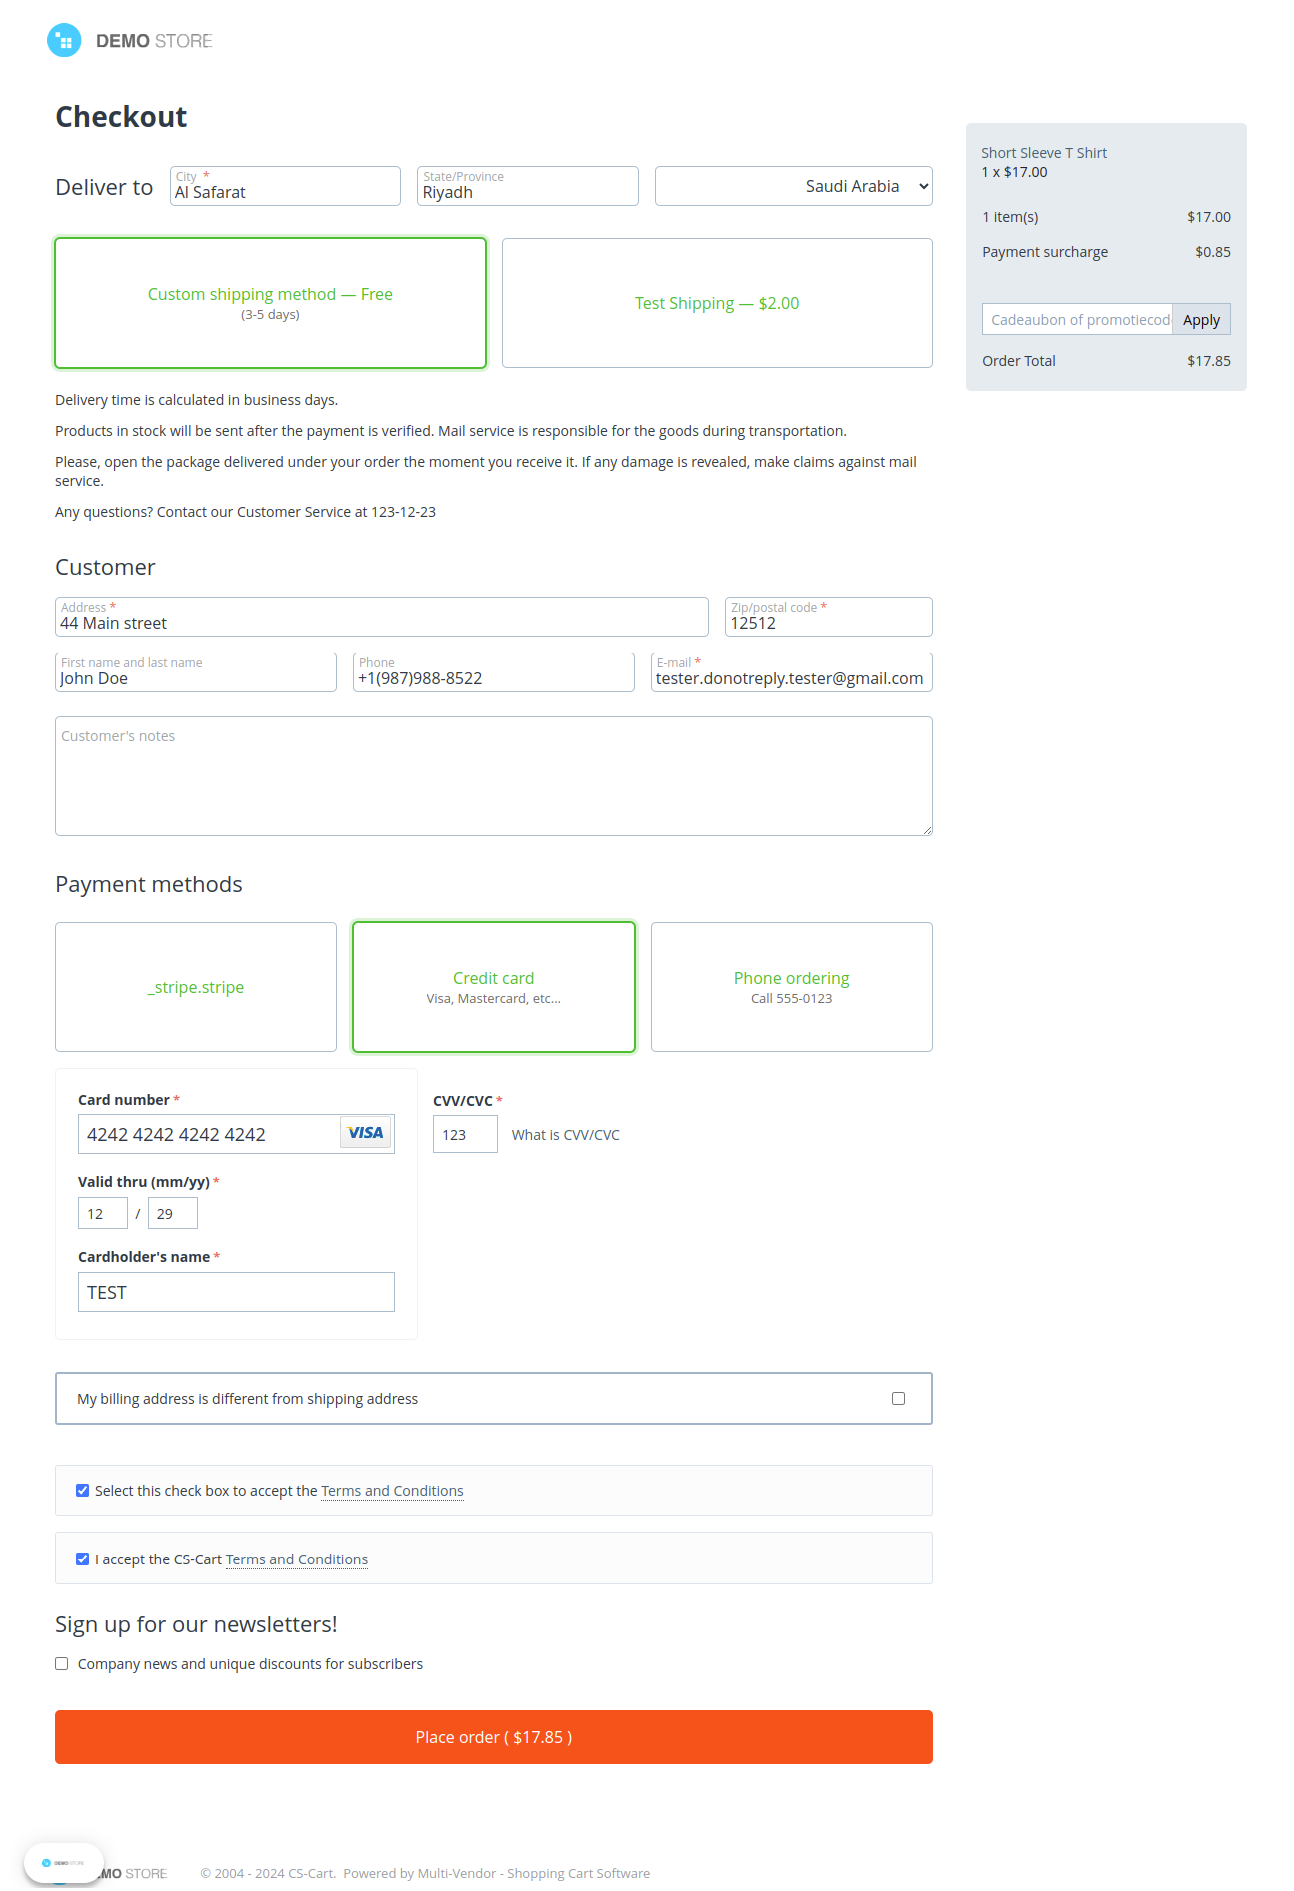
Step 7 : Open the product at front end and click on Add to Cart , proceed to checkout
%201.png?1724154407075)
%202.png?1724154459027)
Step 8 : Select Orders -> View Orders at admin panel
%209.png?1724154871076)
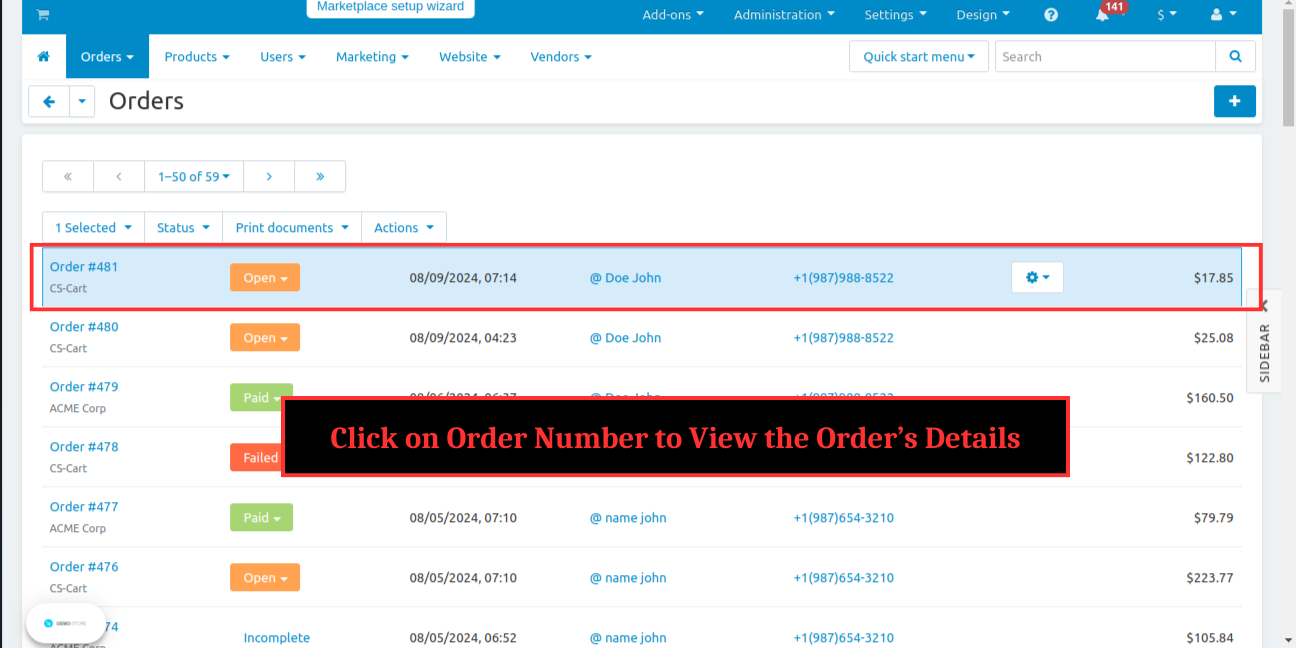
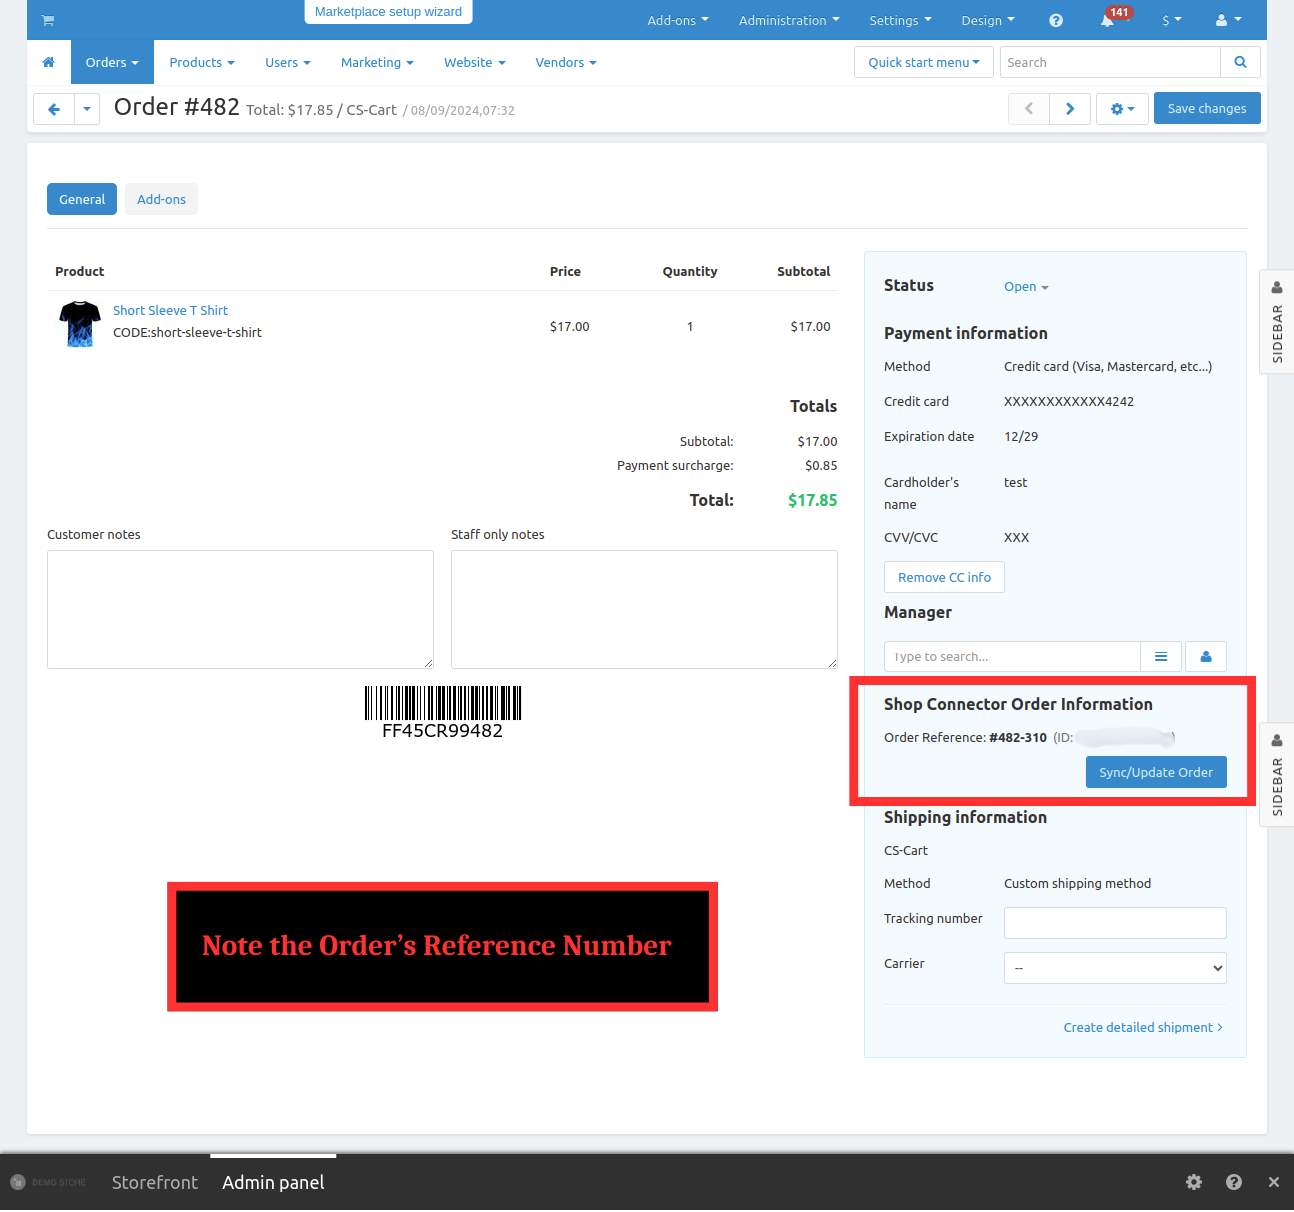
Step 9 : Click on Order Number to view the order’s details
%2010.png?1724154883041)
Step 10 : Note the order’s reference number
%2011.png?1724154933721)
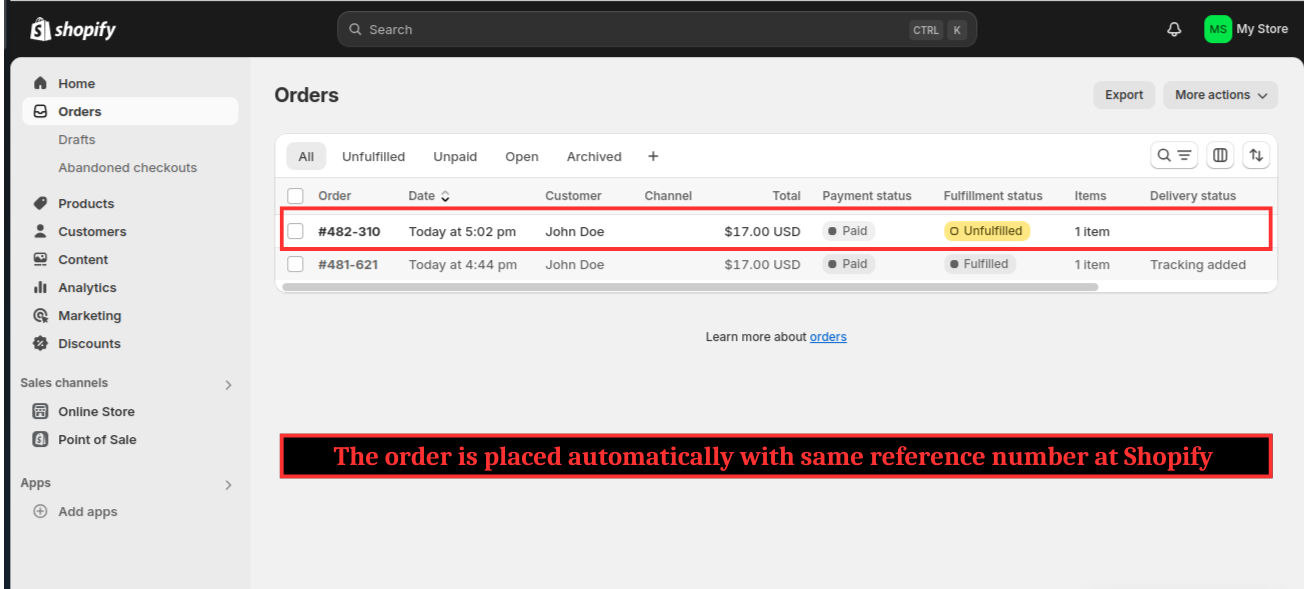
Step 11 : The order is placed automatically with same reference number at Shopify

# Additional Features Supported
- When product deleted in shopify , then it automatically disabled in CS-Cart
- When order placed in CS-Cart , then auto-sync/created in shopify
- One way Shipment sync from CS-Cart to Shopify
Using the Shopify Connector add-on for CS-Cart Multivendor simplifies the integration between your Shopify store and CS-Cart marketplace.
By enabling seamless product synchronization , order management and inventory updates , this add-on ensures that your data remains accurate and up-to-date across both platforms.
With features like order syncing , you can focus more on growing your business rather than managing technical details.
Whether you are aiming for smoother workflows or better data consistency , this add-on provides a comprehensive solution to optimize your e-commerce experience.
Shopify Integration Steps: After creating a store, get Access Token (STEPS FOR STORES CREATED BEFORE 1st JAN 2026)
Step 1 : Click on ‘Create an app’

Step 2 : Enter the App name and click on ‘Create app’
Step 3 : After creating app , In the API credentials , Select Configure Admin API Scopes

Step 4 : Select all the checkboxes related to orders , products , inventory , fulfilment and Script tags ; Click on Save at the top

Step 5 : Once the configuration is saved , Install app button enables
Click on the Install app button

Step 6 : Click on Install at the pop-up

Step 7 : Once the app is installed , the admin API access token generated successfully ; Click on reveal token once and copy the token

Note : The generated token can reveal only once , admin cannot view token again. So , do copy the token and keep it
1.0.1: October 2024
- Improved products save code
- Improved webhook callback
- Implemented new setting for enable/disable override category changes in products
- Improved order sync code in Shopify connector addon
Shopify Integration Steps: After creating a store, get the Client ID and Client Secret (STEPS FOR STORES CREATED AFTER 1st JAN 2026
Step 1 : Log in to Shopify, go to Settings > Apps, click Develop apps, then click the Build apps in Dev Dashboard button.

Step 2 : In the Dev Dashboard, create a new app and provide an app name (e.g., Shop Connector).
Note : If you have already created the app and want to use the same app, update the app settings by selecting the app, going to the Versions tab, clicking Create a New Version, and then following the steps below.
Step 3 : Update the App URL field with your website URL.

Step 4 : Copy all the required scopes from the Shopify Shop in CS-Cart and paste them into the Scopes field under the Access tab.

Note : You can obtain these scopes directly from the shop OR copy the list provided below. There is no need to select them manually.
Scopes list: read_products, read_inventory, read_orders, write_orders, read_fulfillments, write_fulfillments, read_assigned_fulfillment_orders

Note : Ensure that "Use legacy install flow" is unchecked.
Step 5 : Then click the Release button at the bottom of the page.
A new popup will appear. You can provide a custom version name (optional). If left empty, it will be auto-generated. Click the Release button in the popup.

Step 6 : Go to the Settings tab on the left to obtain the Client ID and Secret Key, which are required for shop setup.

Your app setup is Complete.
Installation - If you do not have a linked Shopify Partner account:
Step 7 : Navigate to the Home tab on the left and click install app button.

Step 8 : An app installation popup will appear, select your store. Click Install to install the app.

Your app setup and installation are now complete.
Installation - If you have a linked Shopify Partner account:
Step 9 : Navigate to the Home tab on the left and select App distribution.

Step 10 : Choose Custom distribution, click the Select button, then confirm Select custom distribution in the popup.


Step 11 : Add your Shopify store URL and generate the install link. Copy this install link and open it in a new browser tab to install the app in your store.


Step 12 : An app installation popup will appear for the selected store. Click Install to install the app.
Your app setup and installation are now complete.
Compatible versions:
- 4.10.1
- 4.10.2
- 4.10.3
- 4.10.4
- 4.10.4.SP1
- 4.11.1
- 4.11.2
- 4.11.3
- 4.11.4
- 4.11.5
- 4.12.1
- 4.12.2
- 4.13.1
- 4.13.2
- 4.13.2.SP1
- 4.13.2.SP2
- 4.13.3
- 4.14.1
- 4.14.1.SP1
- 4.14.2
- 4.14.2.SP1
- 4.14.3
- 4.14.3.SP1
- 4.15.1
- 4.15.1.SP1
- 4.15.1.SP2
- 4.15.1.SP3
- 4.15.1.SP4
- 4.15.2
- 4.16.1
- 4.16.2
- 4.17.1
- 4.17.2
- 4.17.2.SP2
- 4.17.2.SP3
- 4.18.1
- 4.18.1.SP1
- 4.18.2
- 4.18.2.SP1
- 4.6.3
- 4.7.1
- 4.7.2
- 4.7.3
- 4.7.4
- 4.8.1
- 4.8.2
- 4.9.1
- 4.9.2
- 4.9.3
Localizations:
- English
Payment type:
One-time payment
Product:
- Multi-Vendor
- Multi-Vendor Plus
- Multi-Vendor Ultimate
Addons features
Server Update:
Shared features
Free:
On market:
RTL Support:
No reviews found
FAQ Block