0 Item
Save 20%

Wix CS-Cart MultiVendor connector
Introducing our Wix CS-Cart MultiVendor connector add-On, a powerful solution that integrate vendor Wix shops with your CS-Cart Multivendor marketplace: enabling seamless data synchronization between the two platforms with features like Product Importing, Order Management, Inventory Management, Data Mapping & Shipment Generation etc.
Wix Connector add-on for Cs-cart Multivendor
Seamlessly integrate your vendor’s Wix website with your CS-Cart marketplace
- Seamless Integration : Connects Wix with CS-Cart to ensure smooth data flow between the two systems.
- Product Importing : Automatically import products, including variants, options, descriptions, prices and images, from Wix to CS-Cart.
- Order Management : Transfers orders from CS-Cart to Wix for efficient processing and management, including order status updates.
- Inventory Management : Synchronizes stock levels to prevent overselling and ensure accurate inventory data across both systems.
- Data Mapping : Allows mapping of collections and product type from Wix with CS-Cart categories to ensure compatibility between Wix and CS-Cart data structures.
- Shipment Creation at CS-Cart : Generate shipment with tracking number at Wix.
- Synchronized Shipment Tracking : The same shipment with the identical tracking number is automatically placed in Wix. (One way sync)
- The add-on simplifies admin tasks by automating product synchronization from Wix to CS-Cart , ensuring efficient management and accurate data flow.
- The add-on provides customers with a seamless shopping experience by ensuring up-to-date product information and synchronized order processing across Wix and CS-Cart.
Why our Wix add-on is the ultimate choice for E-commerce Enhancement?
- Hassle-Free Integration: This add-on ensures a smooth and hassle-free integration process, allowing you to quickly and effortlessly connect your CS-Cart store with the Wix add-on.
Note : The Shop Connector Manager should be purchased and installed before Wix Shop Connector to make the Wix Shop Connector functioning well.
Add-on Installation Steps
Step 1 : Open the Add-ons drop-down and select ‘downloaded add-on’

Step 2 : Click on gear wheel and select ‘Manual installation’

Step 3 : Upload the zip file and click ‘Upload and install’

The add-on installed successfully


Note : The Shop Connector Manager should be purchased and installed before Wix Shop Connector to make the Wix Shop Connector functioning well.
CS-Cart Integration Steps:
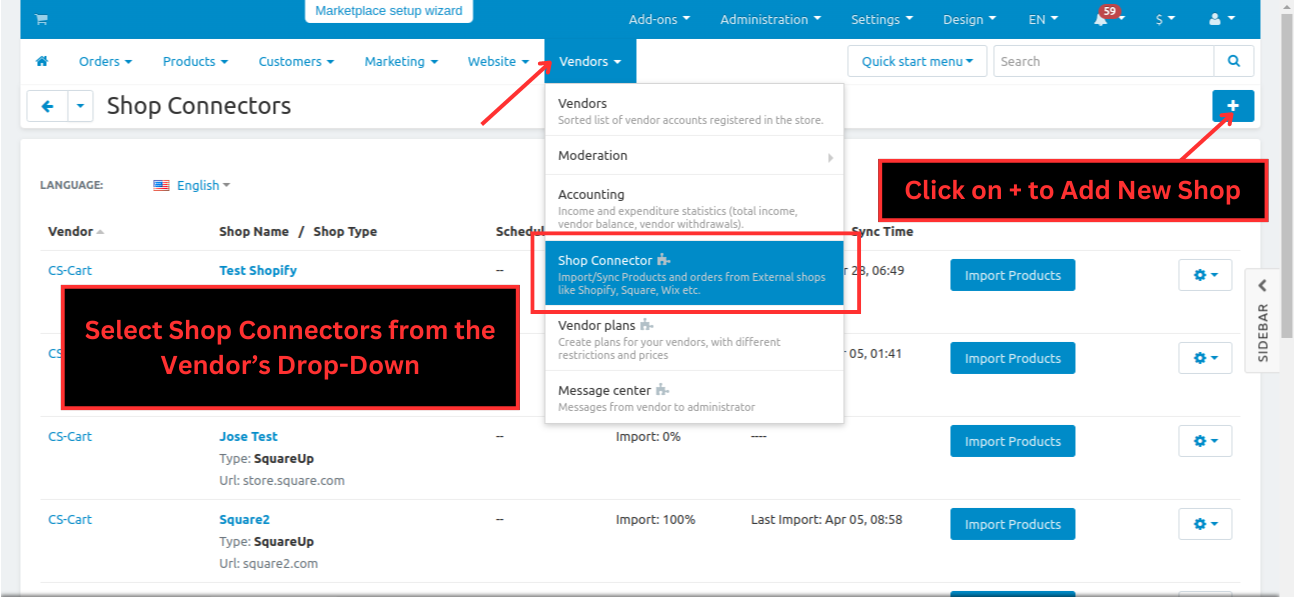
Step 1 : Open the CS-Cart and Select Shop Connectors from the Vendor’s Drop-Down and Click on + to Add a New Shop
%201.png?1724676902087)
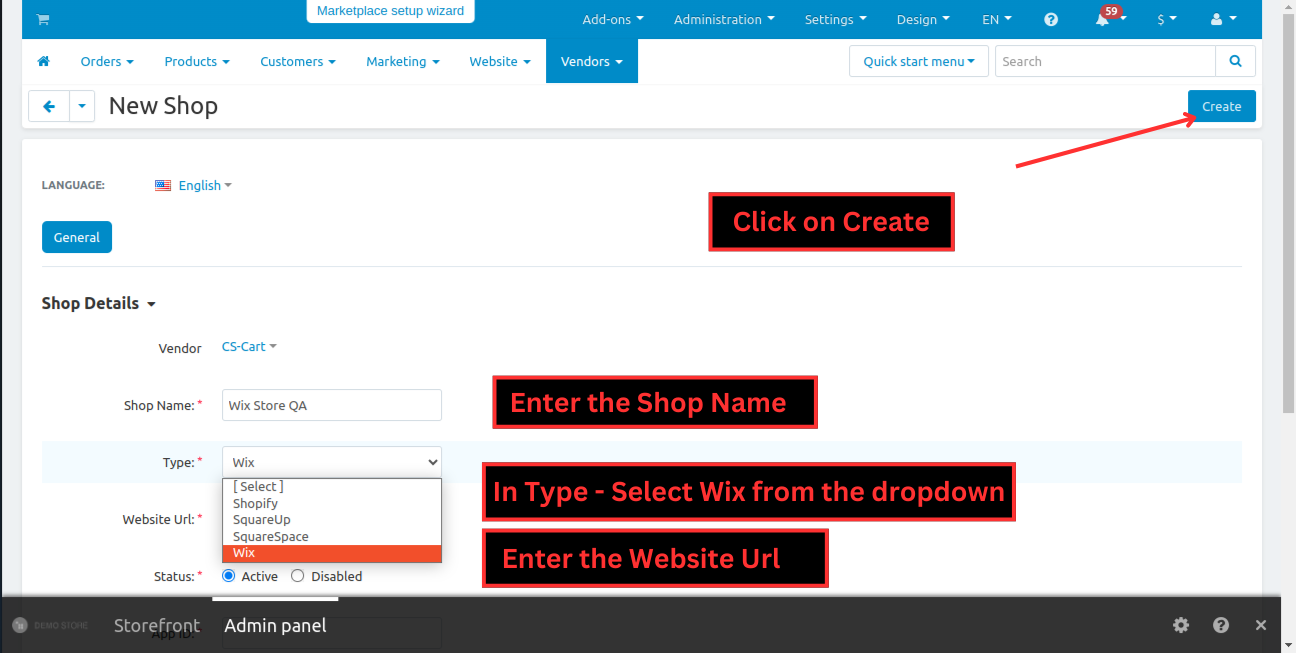
Step 2 :
- Enter the Shop Name
- In Type : Select Wix from the drop-down
- Enter the Wix Store/Website URL
- Click on Create
%202.png?1724676915375)
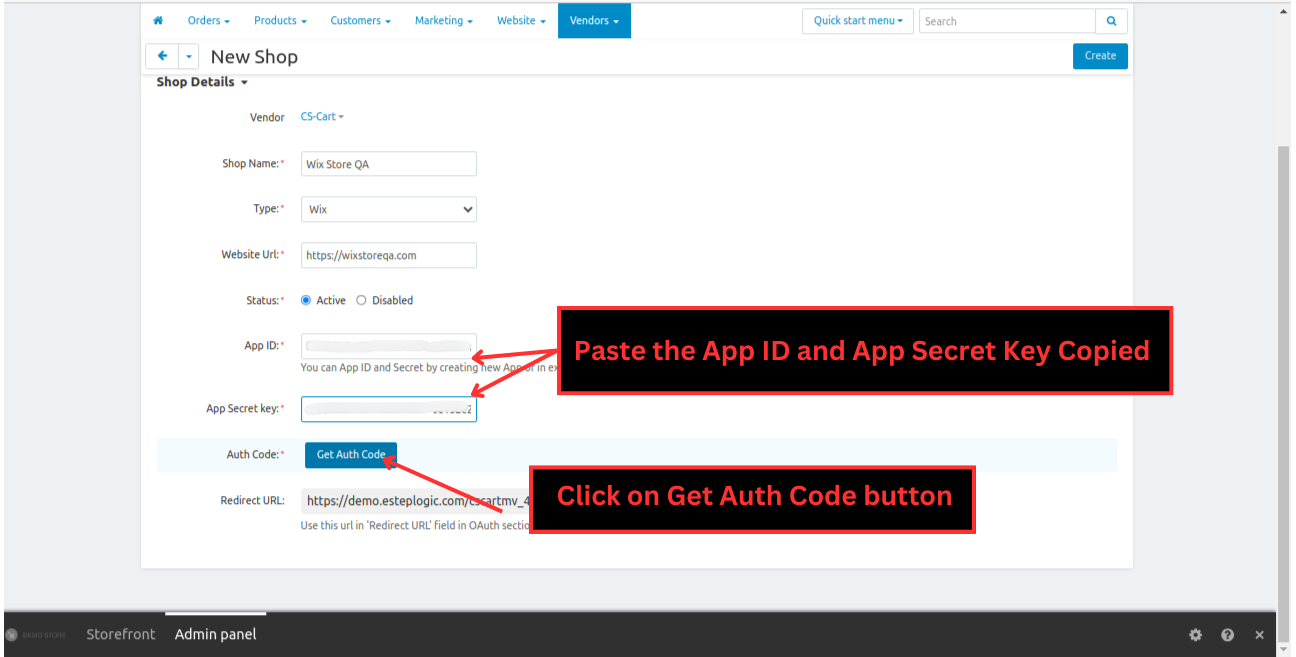
Now , the App ID , App Secret Key , AuthCode , Redirect URL fields enabled.
Note : Follow Steps 1 to 8 in the ‘Wix Integration Steps’ to obtain Your App ID, Secret Key and configure the required permissions.
Step 3 : Now Paste the App ID and App Secret Key copied and click on Get Auth Code
%203.png?1724676930021)
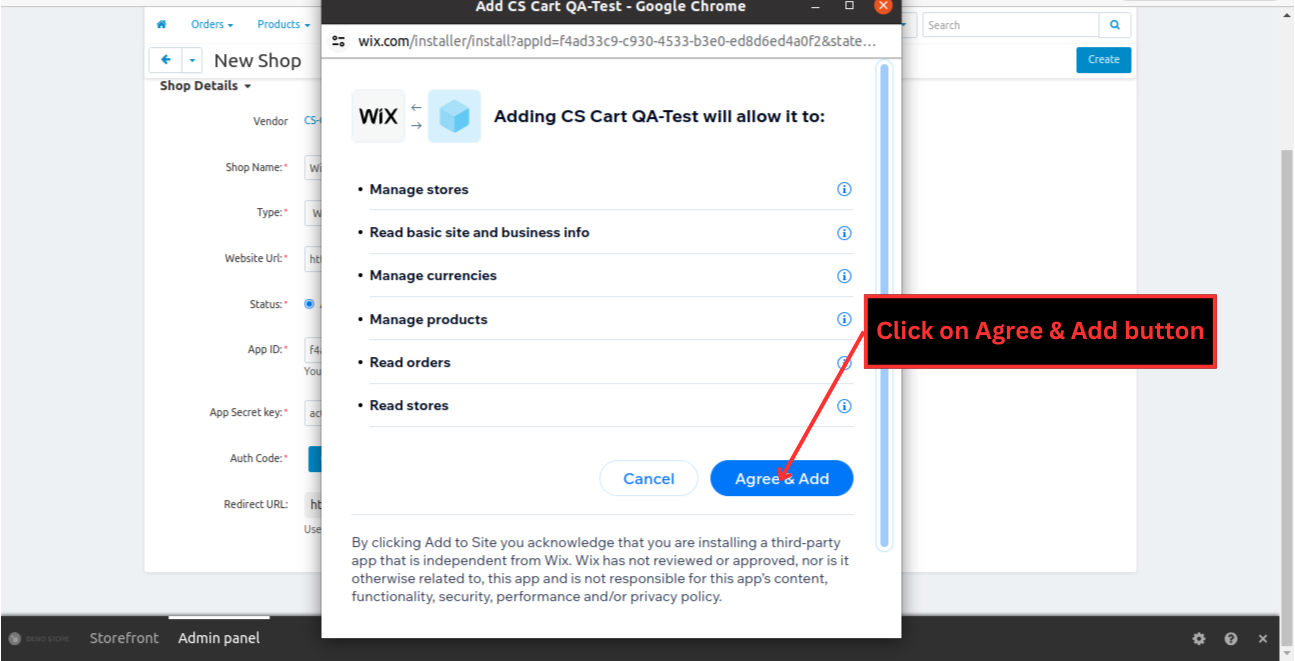
Step 4 : Click on Agree & Add button at the pop-up
%204.png?1724676943243)
Note :If you have multiple websites in wix account , then it first ask for selecting a website.
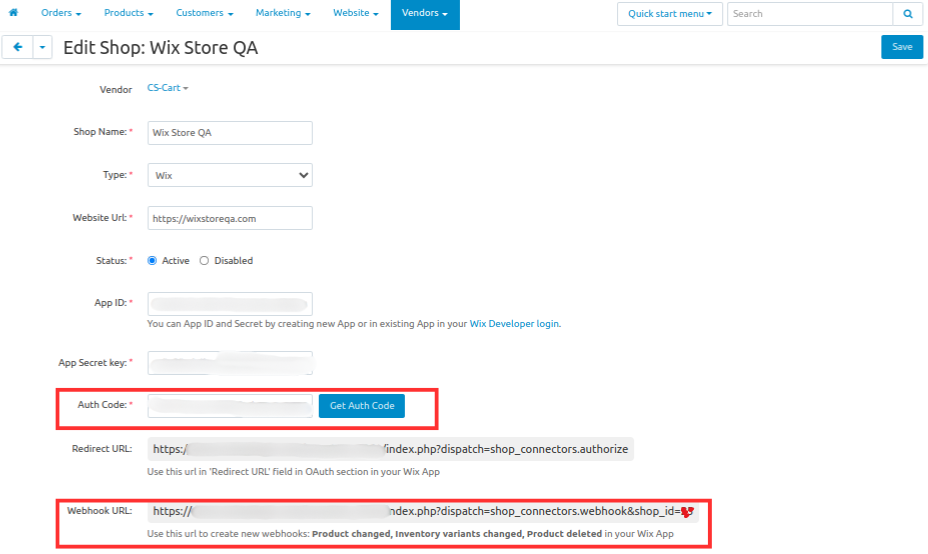
AuthCode and Webhook URLs generated successfully
%205.png?1724676962890)
Note :Copy this Webhook URL
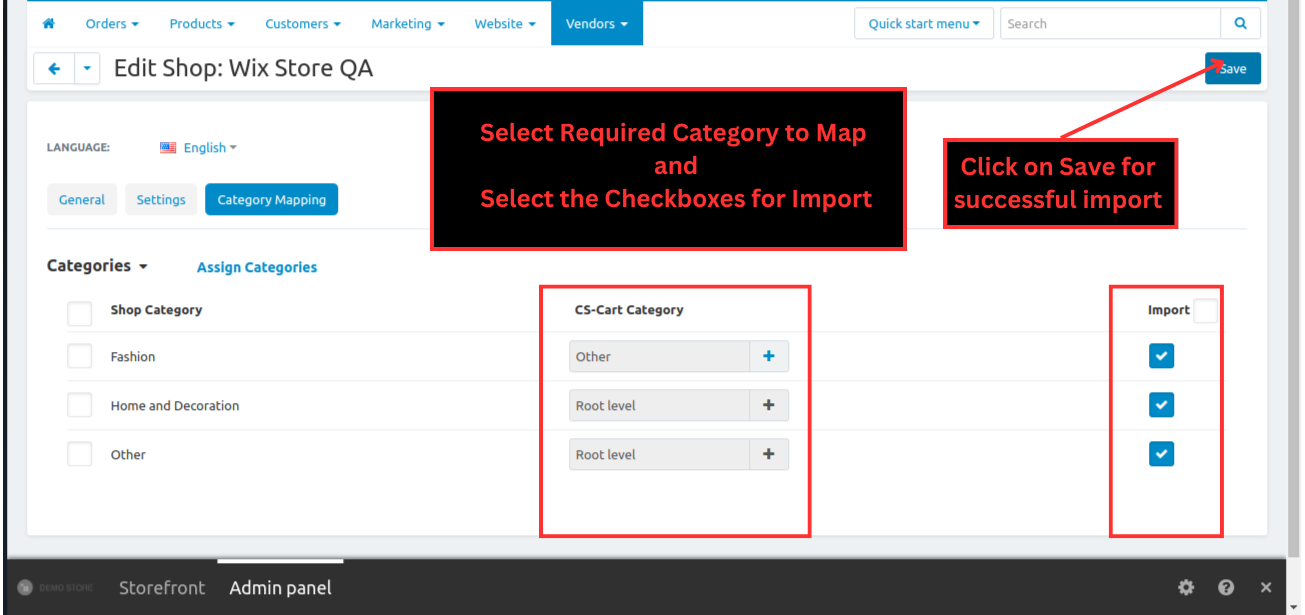
Step 5 : Open the Category Mapping tab , Select Required Category to Map , Select the checkboxes for import and Click on Save for successful import
%206.png?1724676976827)
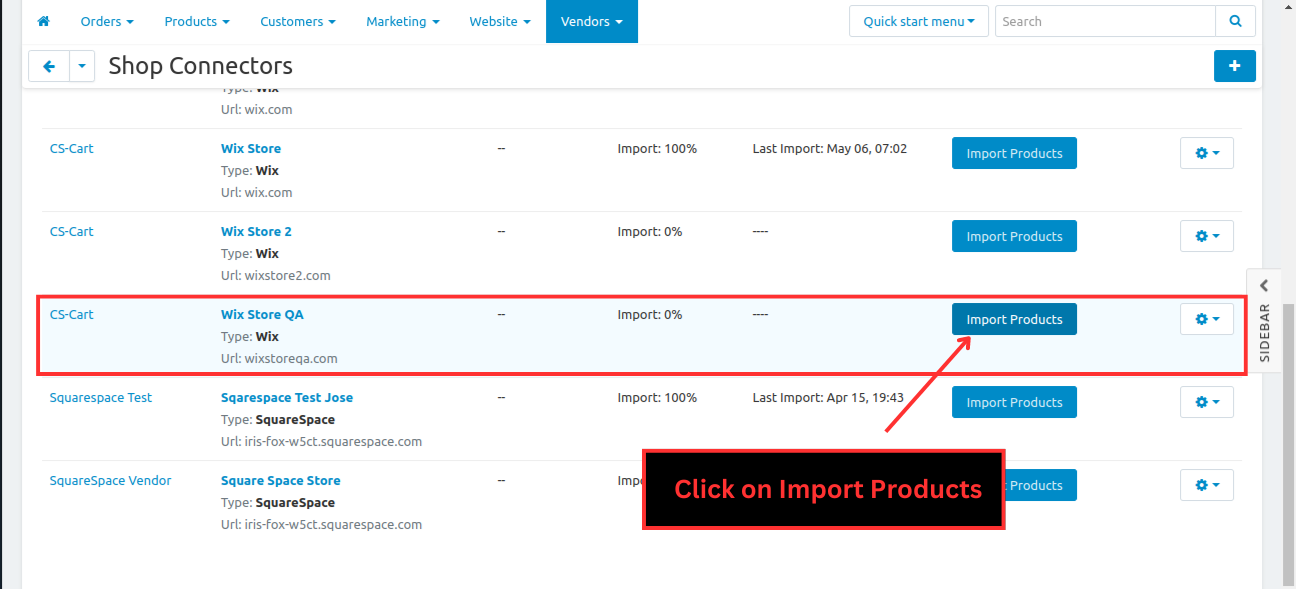
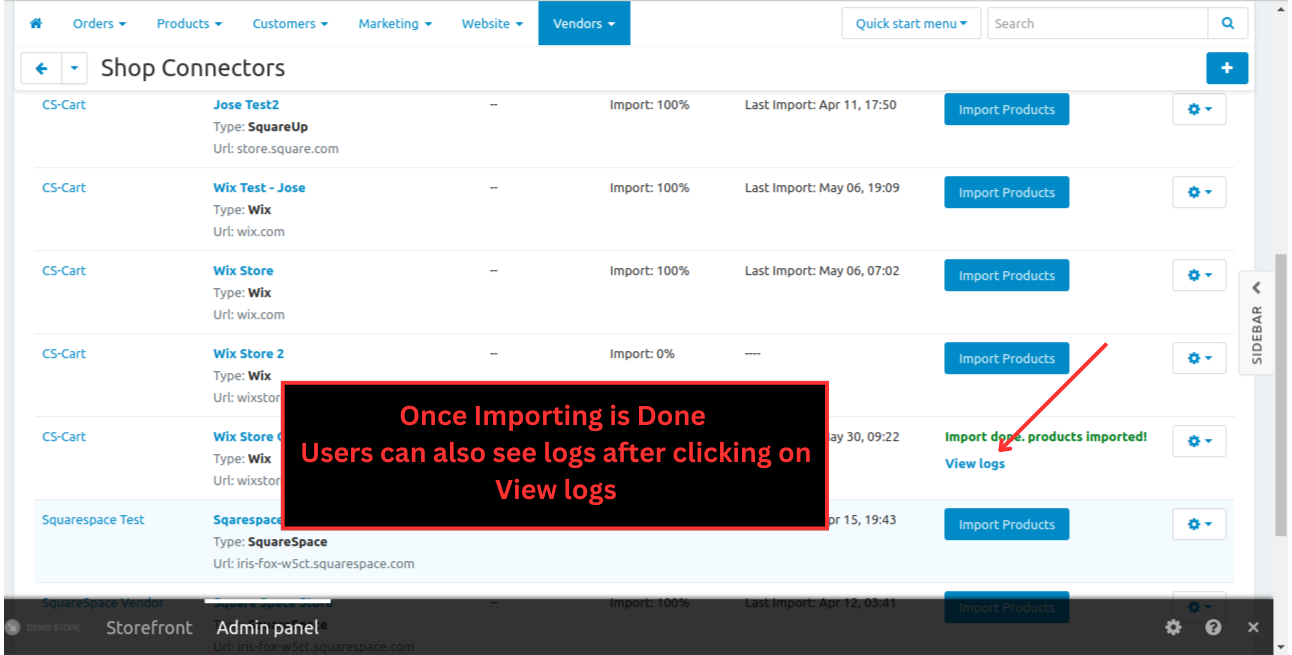
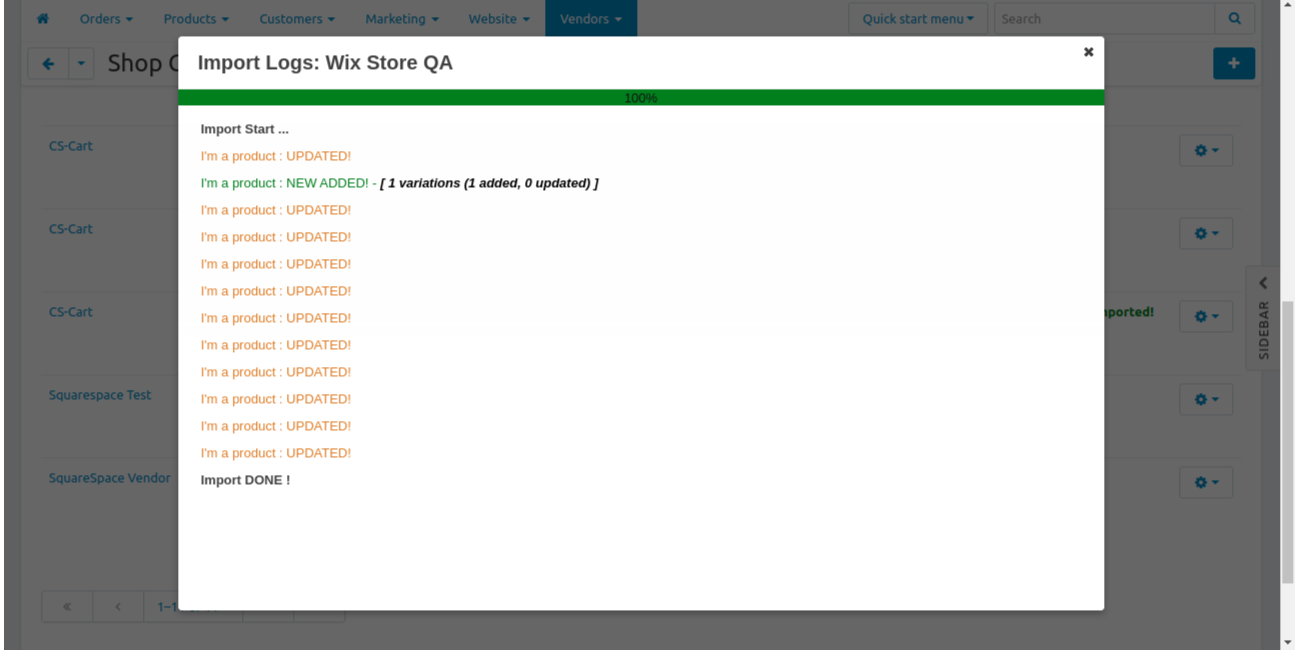
Step 6 : Open the Listing of Shop Connectors and Click on Import Products of that particular Shop Created
%207.png?1724676990542)
Note :Copy this Webhook URL
%208.png?1724677027650)
%209.png?1724677061482)
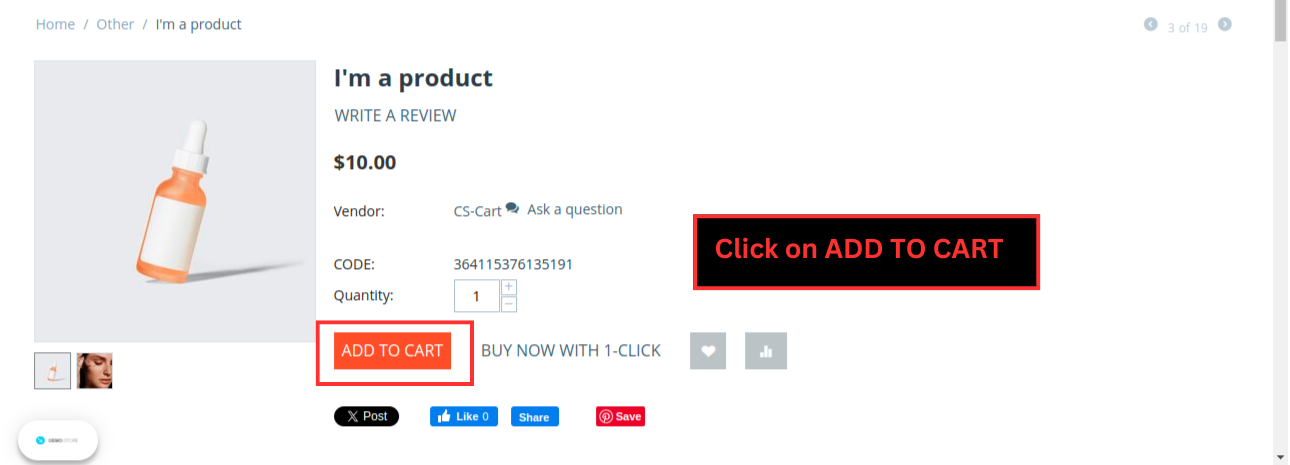
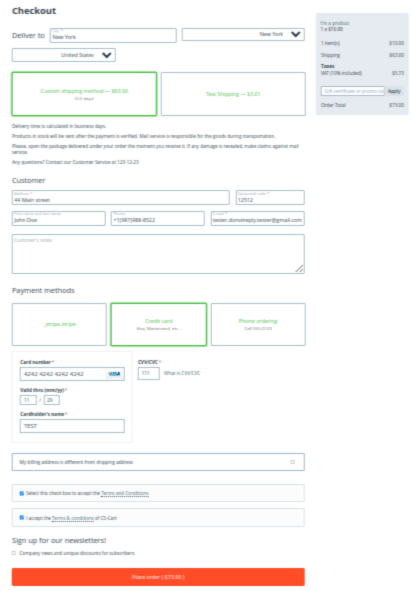
Step 7 : Open the Product at front end and Click on ‘Add to Cart’ proceeding to Checkout
%201.png?1724677271738)
Enter the required details at checkout page and Click on Place Order
%202.png?1724677284987)
Step 8 : Select Orders -> View Orders at admin panel and Click on Order number to view order’s details
%2011.png?1724677349995)
Step 9 : Note the Order reference number from the order’s detailed screen
%2012.png?1724677392289)
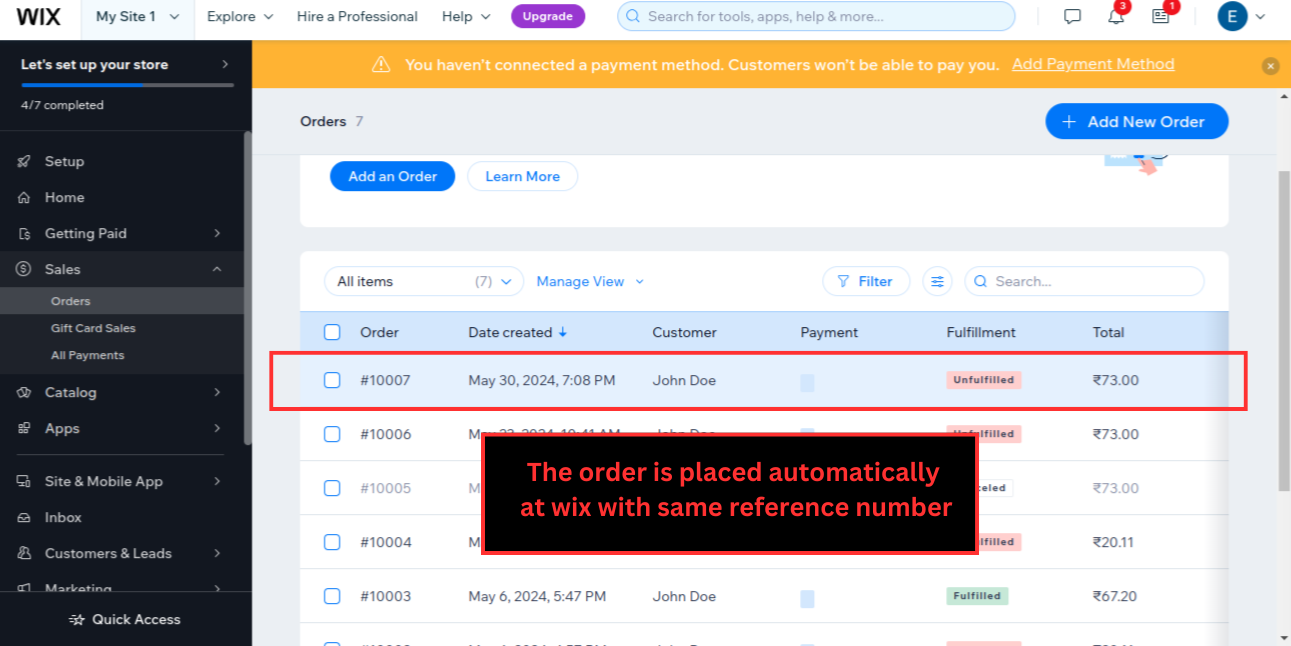
Step 10 : Now open the ‘https://manage.wix.com/’ -> sales -> orders

The order is placed automatically at wix with same reference number
# Additional Features Supported
- When product updated or deleted in wix , then it same automatically sync in CS-Cart
- When order placing in CS-Cart , then auto-sync/created in wix
- Shipment created at CS-Cart to Wix , One-Way Sync
Using this Wix add-on , you will gain easy access to powerful features that boost conversions and provide a transparent payment edge.
Combined with Wix’s extensive additional features , this add-on will enhance your website’s functionality and user experience , helping you achieve your business goals with ease.
Additionally , you’ll benefit from seamless integration with other wix apps and tools and enjoy peace of mind with reliable, 24/7 support.
Easy to access: Our accessible add-on is widely favored as it is extremely user-friendly and offers fast and reliable services.
Minimal technical expertise is required for effortless integration into your CS-Cart store.
Wix Integration Steps:
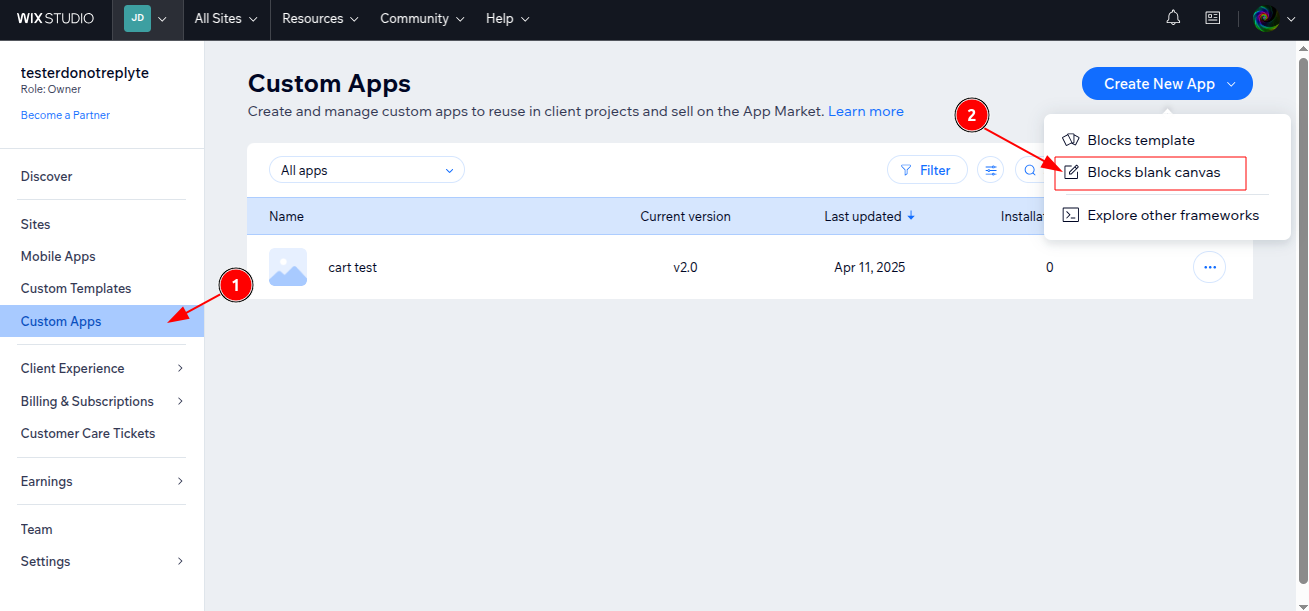
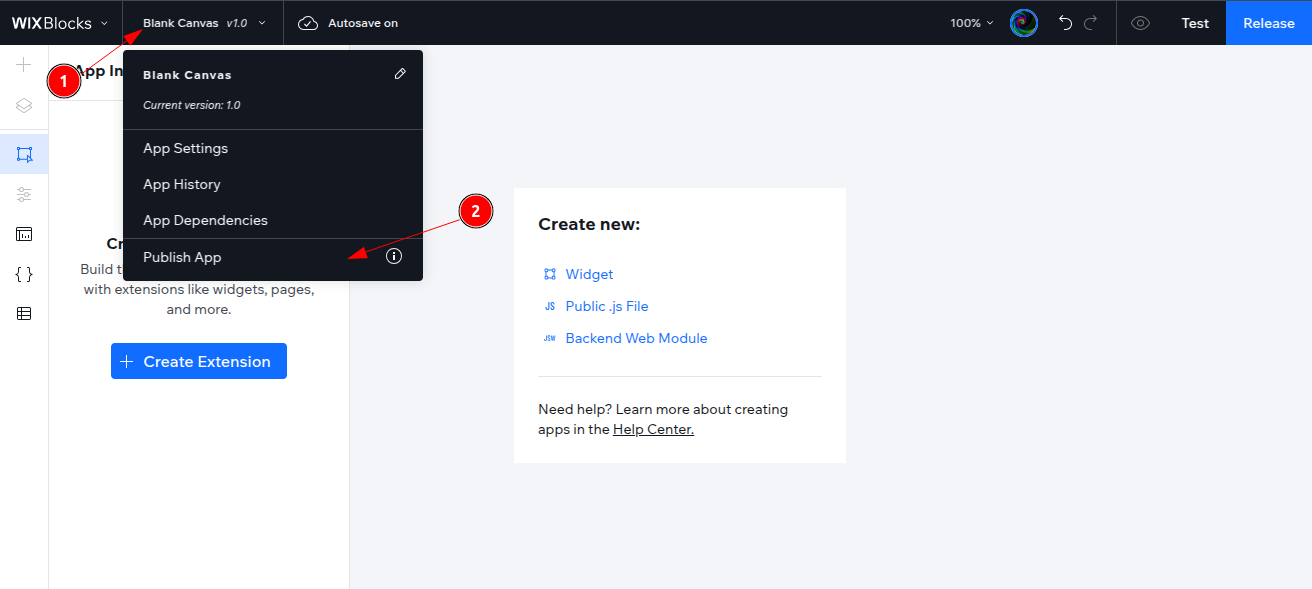
Step 1 : Login with Wix Studio https://manage.wix.com/studio and click on ‘Create New App’ button , Select 'Blocks blank canvas' option from the drop-down.
Step 2 : Delete the Blank Canvas/Widget and Release the Version.
- Click 3 dotes next to the Widget
- Select Delete to remove the Widget
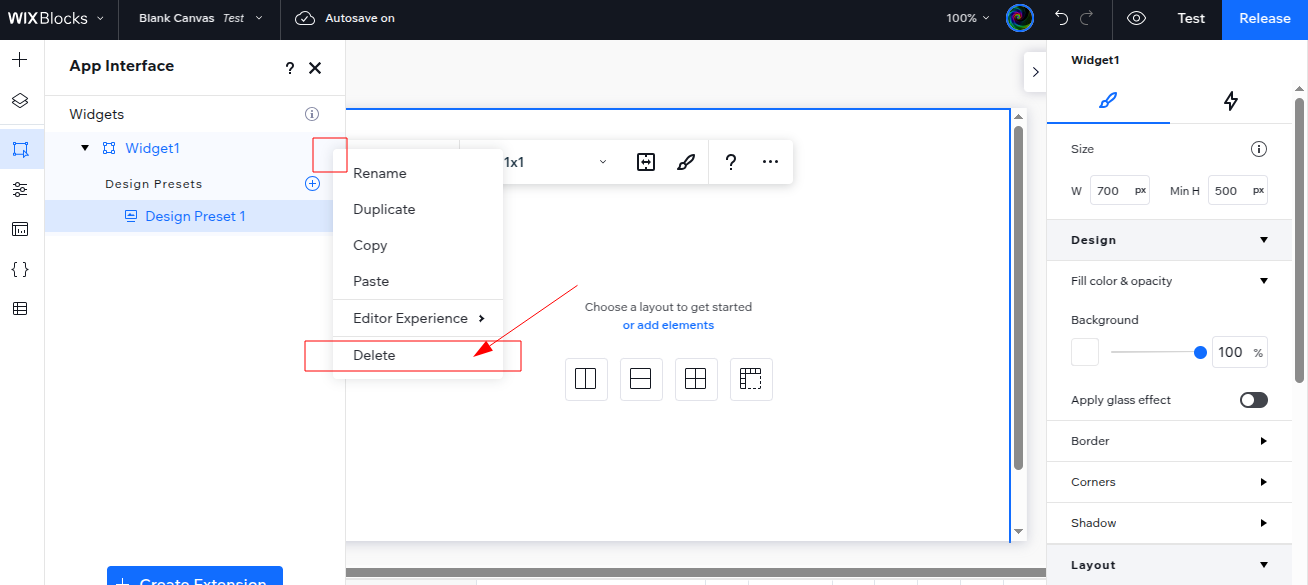
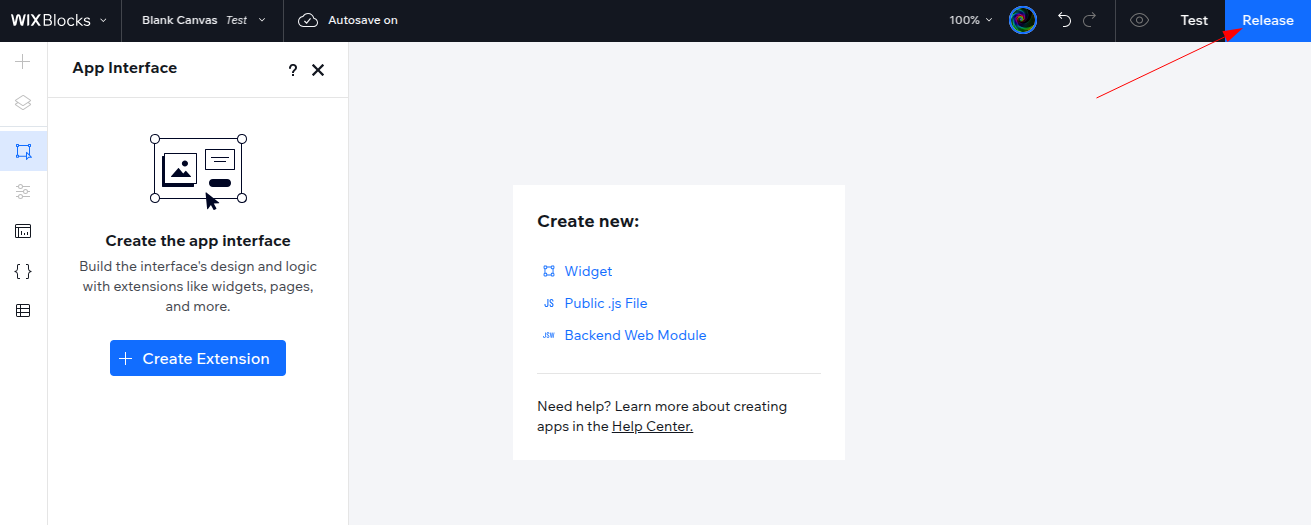
- After deleting the widget, click the Release button at the top right. (You may rename the app if needed.)
- Click Save & Continue
- Click Release again
- In the next popup, click Got it. (app version 1.0 is released)
Step 3 : Open the Publish App
In Home, you can change app name & also change it from the ‘App Profile’ option
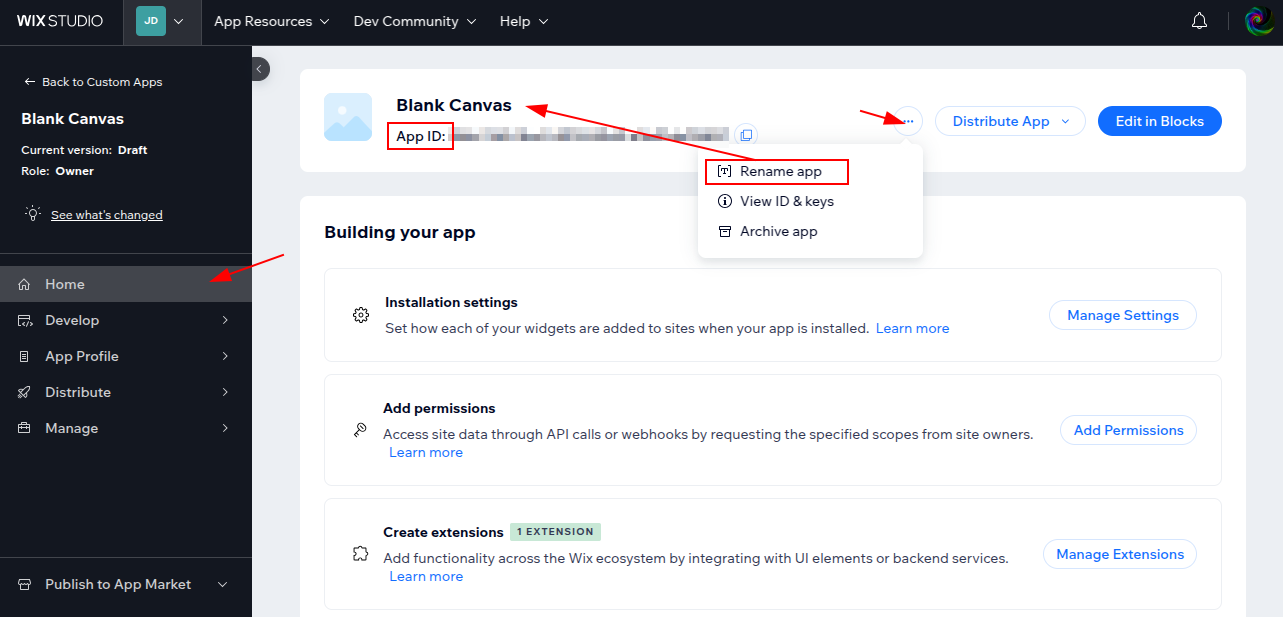
Note : Here , User can obtain App ID as well
Step 4 : Obtain the App ID and Secret Key from OAuth tab under ‘Develop’ section on the left sidebar.
- Here , You can obtain App ID and Secret Key
- In the OAuth Page of this app , Click on ‘ Custom authentication’ section
- In the ‘App Url’ Field , enter your Website URL (https://[domain_name]/)
- Enter the Redirect URL you obtained while creating the Wix shop in CS-Cart.
- Click on Save Button
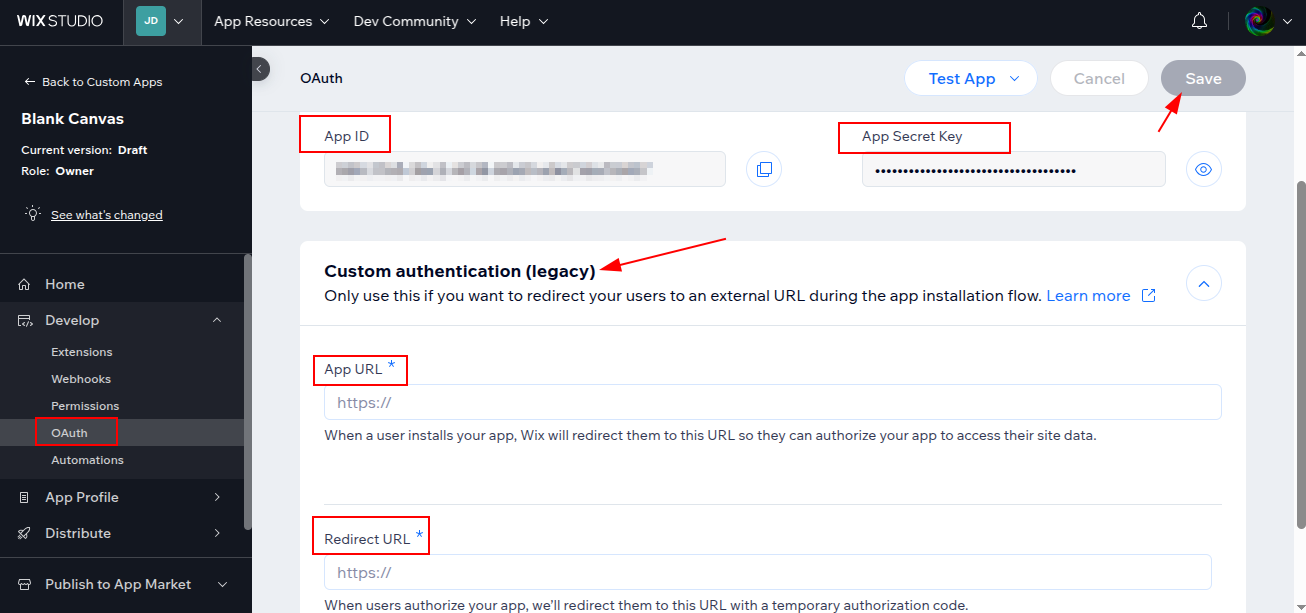
Note : Copy the App ID and Secret Key from here
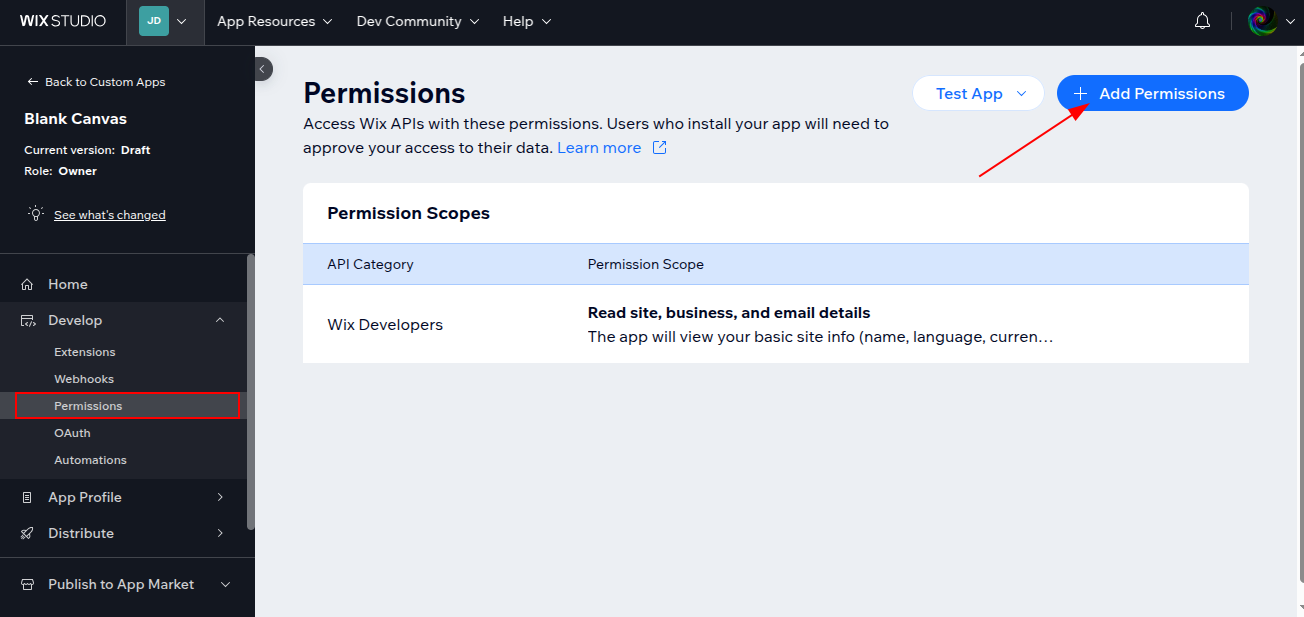
Step 5 : Select Permissions and Click on ‘+ Add Permission’ Button
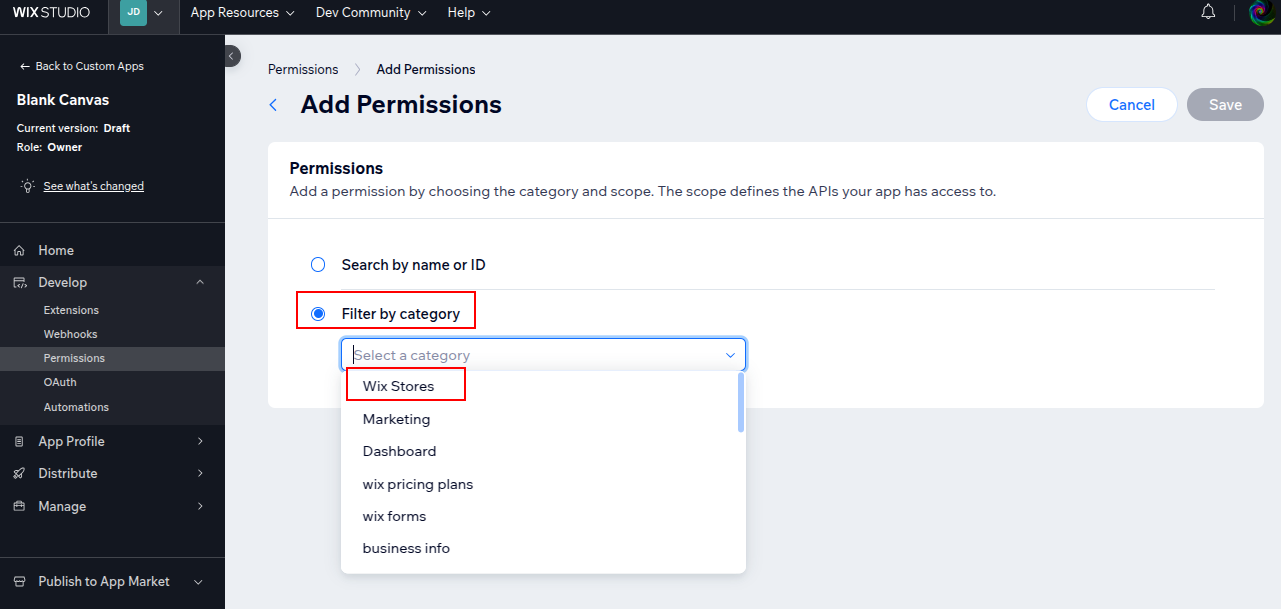
Step 6 : Select ‘Filter by category’ -> Wix Stores from the drop-down
Step 7 : Enable all permissions and click on Save button at the top-right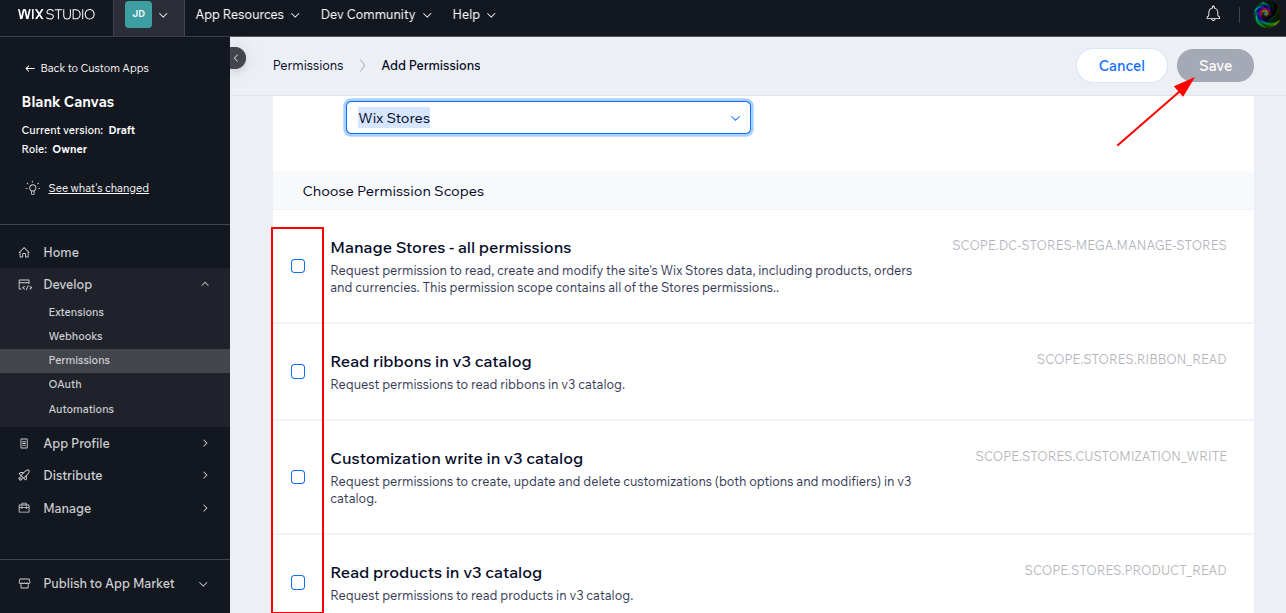
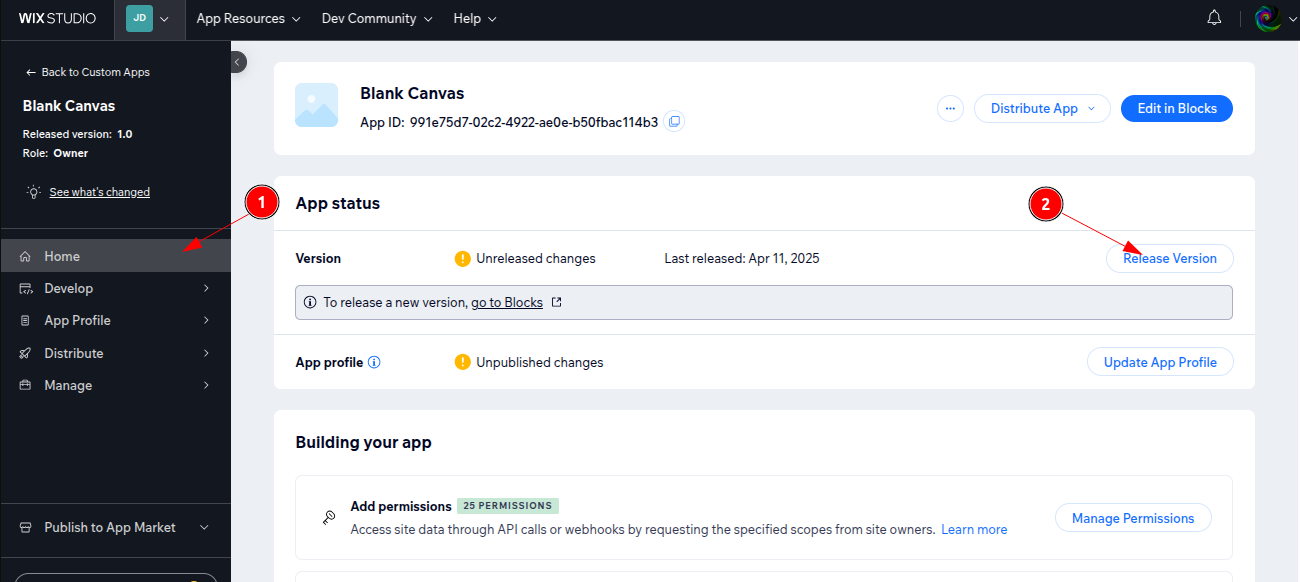
Step 8 : After adding all the required Permissions, release the updated version.
- Navigate to the Home tab
- Click Release Version under App Status
- In the popup, click ‘Go to Blocks’.
- From the top right of the Blocks section, release a new version (e.g., v2.0)
- In the next popup, click Got it.
Note : After these 8 steps now you can Click/get Auth Code in the Cs-Cart while creating new shop with WIX.
Note : Once you have the Webhook URL, proceed with Step 9 after successfully generating auth code in the step 4 of 'Cs-Cart Integration Steps'.
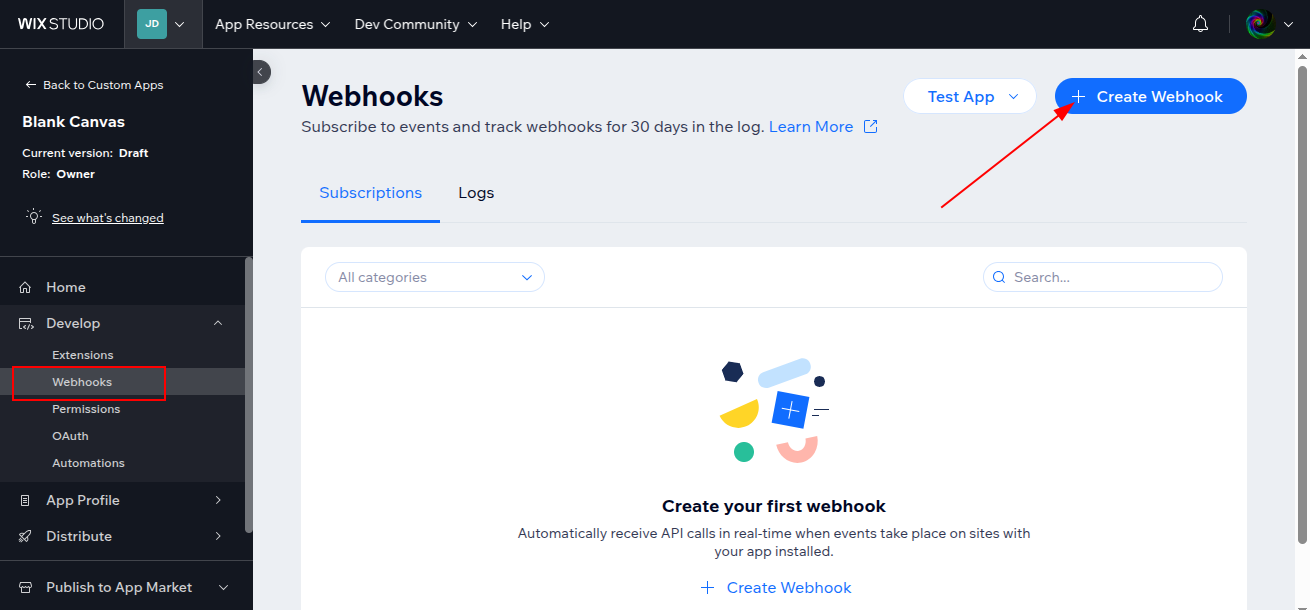
Step 9 : Open the Webhooks link in the left menu and then click on ‘+ Create Webhook’
Step 10 : Select ‘Product Changed’ event and enter Webhook URL you copied while creating the Wix shop in CS-Cart, and click the 'Subscribe' button.
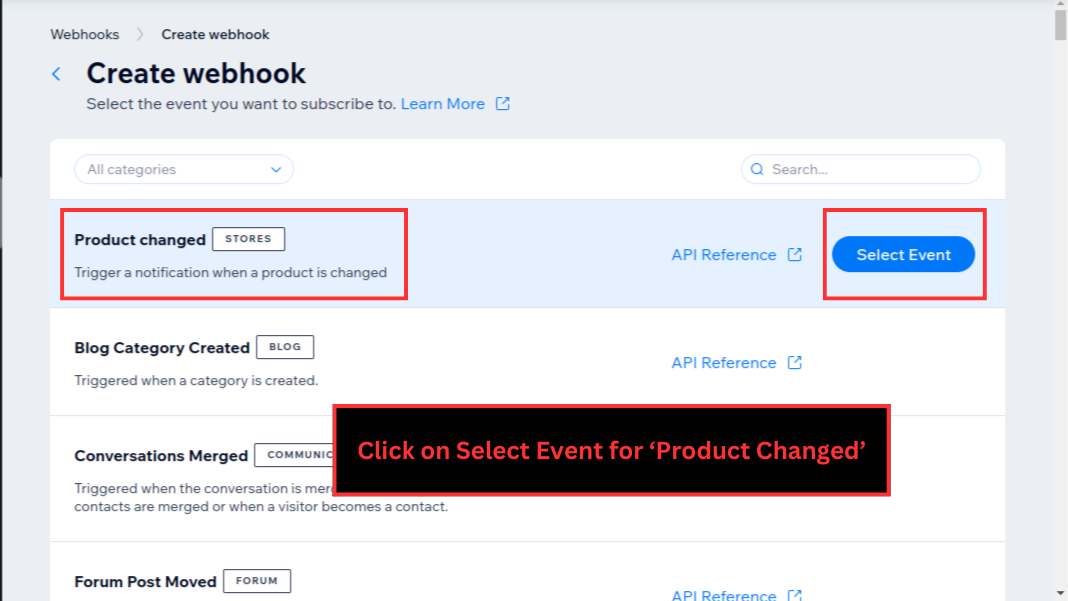
Note : Follow same steps for 2 other events : Inventory variants changed & Product deleted
User can also use Search field to search the event
Compatible versions:
- 4.10.1
- 4.10.2
- 4.10.3
- 4.10.4
- 4.10.4.SP1
- 4.11.1
- 4.11.2
- 4.11.3
- 4.11.4
- 4.11.5
- 4.12.1
- 4.12.2
- 4.13.1
- 4.13.2
- 4.13.2.SP1
- 4.13.2.SP2
- 4.13.3
- 4.14.1
- 4.14.1.SP1
- 4.14.2
- 4.14.2.SP1
- 4.14.3
- 4.14.3.SP1
- 4.15.1
- 4.15.1.SP1
- 4.15.1.SP2
- 4.15.1.SP3
- 4.15.1.SP4
- 4.15.2
- 4.16.1
- 4.16.2
- 4.17.1
- 4.17.2
- 4.17.2.SP1
- 4.17.2.SP2
- 4.17.2.SP3
- 4.18.1
- 4.18.1.SP1
- 4.18.2
- 4.18.2.SP1
- 4.6.3
- 4.7.1
- 4.7.2
- 4.7.3
- 4.7.4
- 4.8.1
- 4.8.2
- 4.9.1
- 4.9.2
- 4.9.3
Localizations:
- English
Payment type:
One-time payment
Product:
- Multi-Vendor
- Multi-Vendor Plus
- Multi-Vendor Ultimate
Addons features
Server Update:
Shared features
Free:
On market:
RTL Support:
No reviews found
FAQ Block